harmony 鸿蒙Video Recording
Video Recording
OpenHarmony provides the AVRecorder for you to develop the video recording service. The AVRecorder supports audio recording, audio encoding, video encoding, audio encapsulation, and video encapsulation. It is applicable to simple video recording scenarios and can be used to generate local video files directly.
You will learn how to use the AVRecorder to complete the process of starting, pausing, resuming, and stopping recording.
During application development, you can use the state attribute of the AVRecorder to obtain the AVRecorder state or call on(‘stateChange’) to listen for state changes. Your code must meet the state machine requirements. For example, pause() is called only when the AVRecorder is in the started state, and resume() is called only when it is in the paused state.
Figure 1 Recording state transition
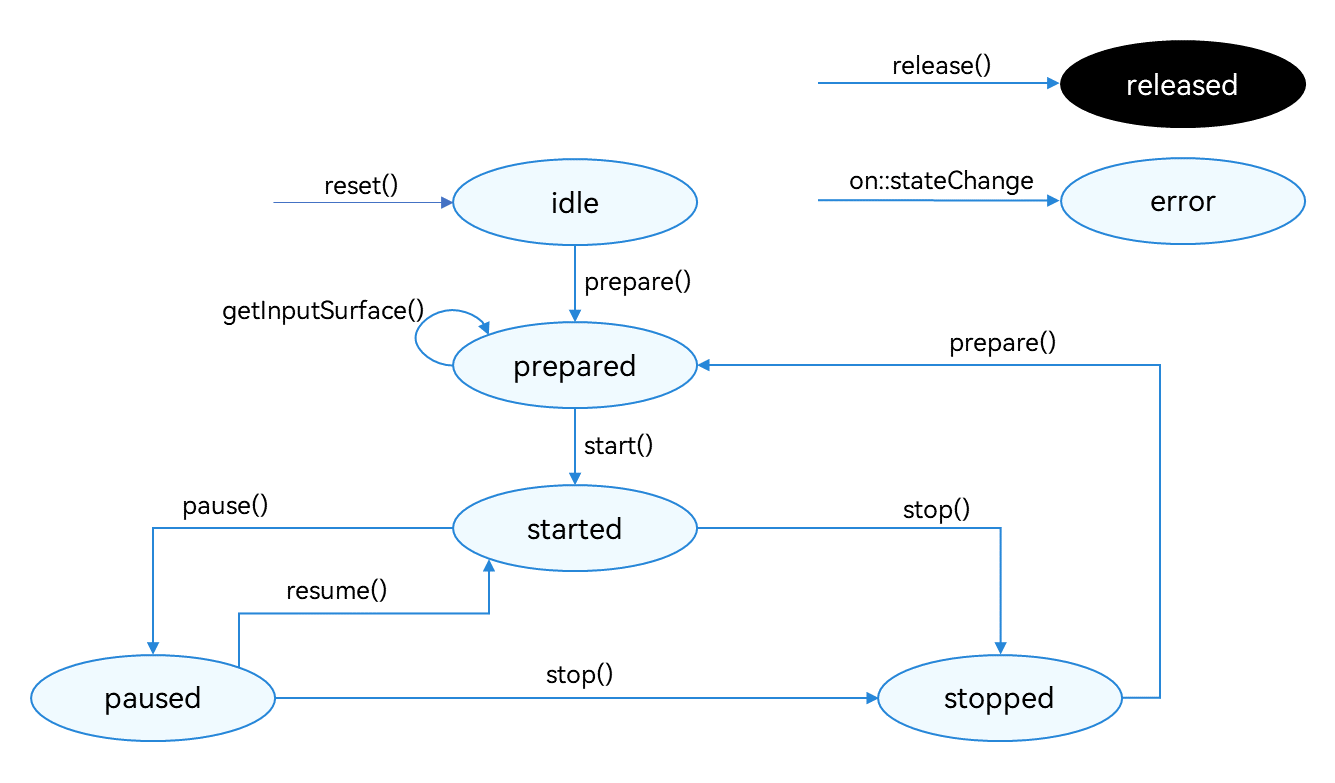
For details about the state, see AVRecorderState.
How to Develop
NOTE
The AVRecorder only processes video data. To complete video recording, it must work with the video data collection module, which transfers the captured video data to the AVRecorder for data processing through the surface. A typical video data collection module is the camera module, which currently is available only to system applications. For details, see Camera.
Read AVRecorder for the API reference.
- Create an AVRecorder instance. The AVRecorder is the idle state.
   import media from '@ohos.multimedia.media'
   let avRecorder: media.AVRecorder;
   media.createAVRecorder().then((recorder: media.AVRecorder) => {
     avRecorder = recorder
   }, (error: Error) => {
     console.error('createAVRecorder failed')
   })
- Set the events to listen for. |Event Type|Description| |——–|——–| |stateChange|Mandatory; used to listen for changes of the state attribute of the AVRecorder.| |error|Mandatory; used to listen for AVRecorder errors.|
   // Callback function for state changes.
   avRecorder.on('stateChange', (state: media.AVRecorderState, reason: media.StateChangeReason) => {
     console.info('current state is: ' + state);
   })
   // Callback function for errors.
   avRecorder.on('error', (err: BusinessError) => {
     console.error('error happened, error message is ' + err);
   })
- Set video recording parameters and call prepare(). The AVRecorder enters the prepared state. > NOTE > > Pay attention to the following when configuring parameters: > > - In pure video recording scenarios, set only video-related parameters in avConfig of prepare(). > If audio-related parameters are configured, the system regards it as audio and video recording. > > - The recording specifications in use must be those supported. The video bit rate, resolution, and frame rate are subject to the ranges supported by the hardware device. > > - The recording output URL (URL in avConfig in the sample code) must be in the format of fd://xx (where xx indicates a file descriptor). You must call ohos.file.fs to implement access to the application file. For details, see Application File Access and Management.
   let avProfile: media.AVRecorderProfile = {
     fileFormat: media.ContainerFormatType.CFT_MPEG_4, // Video file encapsulation format. Only MP4 is supported.
     videoBitrate: 200000, // Video bit rate.
     videoCodec: media.CodecMimeType.VIDEO_AVC, // Video file encoding format. Both MPEG-4 and AVC are supported.
     videoFrameWidth: 640, // Video frame width.
     videoFrameHeight: 480, // Video frame height.
     videoFrameRate: 30 // Video frame rate.
   }
   let avConfig: media.AVRecorderConfig = {
     videoSourceType: media.VideoSourceType.VIDEO_SOURCE_TYPE_SURFACE_YUV, // Video source type. YUV and ES are supported.
     profile : avProfile,
     url: 'fd://35', // Create, read, and write a file by referring to the sample code in Application File Access and Management.
     rotation: 0, // Video rotation angle. The default value is 0, indicating that the video is not rotated. The value can be 0, 90, 180, or 270.
   }
   avRecorder.prepare(avConfig).then(() => {
     console.info('avRecorder prepare success')
   }, (error: Error) => {
     console.error('avRecorder prepare failed')
   })
Obtain the surface ID required for video recording. Call getInputSurface(). The returned surface ID is transferred to the video data collection module (video input source), which is the camera module in the sample code.
The video data collection module obtains the surface based on the surface ID and transmits video data to the AVRecorder through the surface. Then the AVRecorder processes the video data.
   avRecorder.getInputSurface().then((surfaceId: string) => {
     console.info('avRecorder getInputSurface success')
   }, (error: Error) => {
     console.error('avRecorder getInputSurface failed')
   })
- Initialize the video data input source.
This step is performed in the video data collection module. For the camera module, you need to create a Camera instance, obtain the camera list, create a camera input stream, and create a video output stream. For details, see Recording.
- Start recording.
Start the input source to input video data, for example, by calling camera.VideoOutput.start. Then call AVRecorder.start() to switch the AVRecorder to the started state.
Call pause() to pause recording. The AVRecorder enters the paused state. In addition, pause data input in the video data collection module, for example, by calling camera.VideoOutput.stop.
Call resume() to resume recording. The AVRecorder enters the started state again.
Call stop() to stop recording. The AVRecorder enters the stopped state again. In addition, stop camera recording in the video data collection module.
Call reset() to reset the resources. The AVRecorder enters the idle state. In this case, you can reconfigure the recording parameters.
Call release() to release the resources. The AVRecorder enters the released state. In addition, release the video data input source resources (camera resources in this example).
Sample Code
Refer to the sample code below to complete the process of starting, pausing, resuming, and stopping recording.
import media from '@ohos.multimedia.media'
import { BusinessError } from '@ohos.base';
const TAG = 'VideoRecorderDemo:'
export class VideoRecorderDemo {
  private avRecorder: media.AVRecorder|undefined = undefined;
  private videoOutSurfaceId: string = "";
  private avProfile: media.AVRecorderProfile = {
    fileFormat: media.ContainerFormatType.CFT_MPEG_4, // Video file encapsulation format. Only MP4 is supported.
    videoBitrate : 100000, // Video bit rate.
    videoCodec: media.CodecMimeType.VIDEO_AVC, // Video file encoding format. Both MPEG-4 and AVC are supported.
    videoFrameWidth: 640, // Video frame width.
    videoFrameHeight: 480, // Video frame height.
    videoFrameRate: 30 // Video frame rate.
  }
  private avConfig: media.AVRecorderConfig = {
    videoSourceType: media.VideoSourceType.VIDEO_SOURCE_TYPE_SURFACE_YUV, // Video source type. YUV and ES are supported.
    profile : this.avProfile,
    url: 'fd://35', // Create, read, and write a file by referring to the sample code in Application File Access and Management.
    rotation: 0, // Video rotation angle. The default value is 0, indicating that the video is not rotated. The value can be 0, 90, 180, or 270.
  }

  // Set AVRecorder callback functions.
  setAvRecorderCallback() {
    if (this.avRecorder != undefined) {
      // Callback function for state changes.
      this.avRecorder.on('stateChange', (state: media.AVRecorderState, reason: media.StateChangeReason) => {
        console.info(TAG + 'current state is: ' + state);
      })
      // Callback function for errors.
      this.avRecorder.on('error', (err: BusinessError) => {
        console.error(TAG + 'error ocConstantSourceNode, error message is ' + err);
      })
    }
  }

  // Complete camera-related preparations.
  async prepareCamera() {
    // For details on the implementation, see the camera document.
  }

  // Start the camera stream output.
  async startCameraOutput() {
    // Call start of the VideoOutput class to start video output.
  }

  // Stop the camera stream output.
  async stopCameraOutput() {
    // Call stop of the VideoOutput class to stop video output.
  }

  // Release the camera instance.
  async releaseCamera() {
    // Release the instances created during camera preparation.
  }

  // Process of starting recording.
  async startRecordingProcess() {
    if (this.avRecorder != undefined) {
      // 1. Create an AVRecorder instance.
      this.avRecorder = await media.createAVRecorder();
      this.setAvRecorderCallback();
      // 2. Obtain the file descriptor of the recorded file. The obtained file descriptor is passed in to the URL in avConfig. The implementation is omitted here.
      // 3. Set recording parameters to complete the preparations.
      await this.avRecorder.prepare(this.avConfig);
      this.videoOutSurfaceId = await this.avRecorder.getInputSurface();
      // 4. Complete camera-related preparations.
      await this.prepareCamera();
      // 5. Start the camera stream output.
      await this.startCameraOutput();
      // 6. Start recording.
      await this.avRecorder.start();
    }
  }

  // Process of pausing recording.
  async pauseRecordingProcess() {
    if (this.avRecorder != undefined && this.avRecorder.state === 'started') { // pause() can be called only when the AVRecorder is in the started state .
      await this.avRecorder.pause();
      await this.stopCameraOutput(); // Stop the camera stream output.
    }
  }

  // Process of resuming recording.
  async resumeRecordingProcess() {
    if (this.avRecorder != undefined && this.avRecorder.state === 'paused') { // resume() can be called only when the AVRecorder is in the paused state .
      await this.startCameraOutput(); // Start camera stream output.
      await this.avRecorder.resume();
    }
  }

  async stopRecordingProcess() {
    if (this.avRecorder != undefined) {
      // 1. Stop recording.
      if (this.avRecorder.state === 'started'
      ||this.avRecorder.state ==='paused') { // stop() can be called only when the AVRecorder is in the started or paused state.
        await this.avRecorder.stop();
        await this.stopCameraOutput();
      }
      // 2. Reset the AVRecorder.
      await this.avRecorder.reset();
      // 3. Release the AVRecorder instance.
      await this.avRecorder.release();
      // 4. After the file is recorded, close the file descriptor. The implementation is omitted here.
      // 5. Release the camera instance.
      await this.releaseCamera();
    }
  }

  // Complete sample code for starting, pausing, resuming, and stopping recording.
  async videoRecorderDemo() {
    await this.startRecordingProcess();         // Start recording.
    // You can set the recording duration. For example, you can set the sleep mode to prevent code execution.
    await this.pauseRecordingProcess();         // Pause recording.
    await this.resumeRecordingProcess();        // Resume recording.
    await this.stopRecordingProcess();          // Stop recording.
  }
}
你可能感兴趣的鸿蒙文章
harmony 鸿蒙Developing Audio Call
harmony 鸿蒙Audio Call Development
harmony 鸿蒙Audio Effect Management
harmony 鸿蒙Audio Input Device Management
harmony 鸿蒙Audio Output Device Management
- 所属分类: 后端技术
- 本文标签:
热门推荐
-
2、 优质文章
-
3、 gt
-
7、 openharmony
-
9、 golang
-
10、 Vue中input框自动聚焦