harmony 鸿蒙Best Practices for State Management
Best Practices for State Management
This guide outlines best practices for state management in ArkUI applications. Read on to discover the common pitfalls in state management and how to avoid them, with carefully selected examples of recommended and not-recommended practices.
Basic Example
The following example describes the initialization rules of the \@Prop, \@Link, and \@ObjectLink decorators. Before we dive in, a basic knowledge of these decorators is helpful.
\@Prop: An \@Prop decorated variable can be initialized from an \@State decorated variable of the parent component, a @State decorated attribute of the Object or class type in the parent component, or the item of an @State decorated array.
\@ObjectLink: The initialization rule is the same as that of \@Prop, but an \@ObjectLink decorated variable must be initialized from an instance of an \@Observed decorated class.
\@Link: The value type must be the same as that of \@State or any other data source.
Not Recommended
@Observed
class ClassA {
  public c: number = 0;

  constructor(c: number) {
    this.c = c;
  }
}

@Component
struct LinkChild {
  @Link testNum: number;

  build() {
    Text(`LinkChild testNum ${this.testNum}`)
  }
}


@Component
struct PropChild2 {
  @Prop testNum: ClassA = new ClassA(0);

  build() {
    Text(`PropChild2 testNum ${this.testNum.c}`)
      .onClick(() => {
        this.testNum.c += 1;
      })
  }
}

@Component
struct PropChild3 {
  @Prop testNum: ClassA = new ClassA(0);

  build() {
    Text(`PropChild3 testNum ${this.testNum.c}`)
  }
}

@Component
struct ObjectLinkChild {
  @ObjectLink testNum: ClassA;

  build() {
    Text(`ObjectLinkChild testNum ${this.testNum.c}`)
      .onClick(() => {
        // Issue 4: ObjectLink cannot be assigned a value.
        this.testNum = new ClassA(47);
      })
  }
}

@Entry
@Component
struct Parent {
  @State testNum: ClassA[] = [new ClassA(1)];

  build() {
    Column() {
      Text(`Parent testNum ${this.testNum.c}`)
        .onClick(() => {
          this.testNum[0].c += 1;
        })
      // Issue 1: The type of the @Link decorated variable is not the same as that of the data source @State.
      LinkChild({ testNum: this.testNum.c })

      // Issue 2: The @Prop decorated variable is not initialized locally or initialized from the parent component.
      PropChild2()

      // Issue 3: PropChild3 does not change the value of @Prop testNum: ClassA. Therefore, @ObjectLink is a better choice here.
      PropChild3({ testNum: this.testNum[0] })

      ObjectLinkChild({ testNum: this.testNum[0] })
    }
  }
}
The preceding example contains several errors:
\@Component LinkChild: The type of \@Link testNum: number and the initialization from the parent component LinkChild ({testNum:this.testNum.c}) are incorrect. The data source of \@Link must be a decorated state variable. The \@Link decorated variables must be of the same type as the data source, for example, \@Link: T and \@State: T. Therefore, the value should be changed to \@Link testNum: ClassA, and the initialization from the parent component should be LinkChild({testNum: $testNum}).
\@Component PropChild2: An \@Prop decorated variable can be initialized locally or from the parent component, but it must be initialized. \@Prop testNum: ClassA is not initialized locally, and therefore it must be initialized from the parent component: PropChild1({testNum: this.testNum}).
\@Component PropChild3: The \@Prop testNum: ClassA value is not changed. Therefore, \@ObjectLink is a better choice here, because \@Prop involves a deep copy, which can result in an increase in overhead.
Clicking ObjectLinkChild to assign a value to the \@ObjectLink decorated variable: this.testNum = new ClassA(47); is not allowed. For \@ObjectLink that implements two-way data synchronization, assigning a value is equivalent to updating the array item or class attribute in the parent component, which is not supported in TypeScript/JavaScript and will result in a runtime error.
In a non-nested scenario, for example, where the variable declared in the parent is \@State testNum: ClassA = new ClassA(1), Class A does not need to be decorated by \@Observed, since \@State is able to observe changes at the first layer.
Recommended
@Observed
class ClassA {
  public c: number = 0;

  constructor(c: number) {
    this.c = c;
  }
}

@Component
struct LinkChild {
 @Link testNum: ClassA;

 build() {
   Text(`LinkChild testNum ${this.testNum?.c}`)
 }
}

@Component
struct PropChild1 {
 @Prop testNum: ClassA = new ClassA(1);

 build() {
   Text(`PropChild1 testNum ${this.testNum?.c}`)
     .onClick(() => {
       this.testNum = new ClassA(48);
     })
 }
}

@Component
struct ObjectLinkChild {
  @ObjectLink testNum: ClassA;

  build() {
    Text(`ObjectLinkChild testNum ${this.testNum.c}`)
      // The @ObjectLink decorated variable can have the attribute updated.
      .onClick(() => {
        this.testNum.c += 1;
      })
  }
}

@Entry
@Component
struct Parent {
  @State testNum: ClassA[] = [new ClassA(1)];

  build() {
    Column() {
      Text(`Parent testNum ${this.testNum.c}`)
        .onClick(() => {
          this.testNum[0].c += 1;
        })
      // The type of the @Link decorated variable must be the same as that of the data source @State.
      LinkChild({ testNum: this.testNum[0] })

      // @Prop is initialized locally and therefore does not need to be initialized from the parent component.
      PropChild1()

      // When a child component does not need to be changed locally, @ObjectLink is preferred over @Prop, whose deep copy can result in an increase in overhead.
      ObjectLinkChild({ testNum: this.testNum[0] })
    }
  }
}
UI Not Updating on Attribute Changes in Simple Nested Objects
If you find your application UI not updating after an attribute in a nested object is changed, you may want to check the decorators in use.
Each decorator has its scope of observable changes, and only those observed changes can cause the UI to update. The \@Observed decorator can observe the attribute changes of nested objects, while other decorators can observe only the changes at the second layer.
Not Recommended
In the following example, some UI components are not updated.
class ClassA {
  a: number;

  constructor(a: number) {
    this.a = a;
  }

  getA(): number {
    return this.a;
  }

  setA(a: number): void {
    this.a = a;
  }
}

class ClassC {
  c: number;

  constructor(c: number) {
    this.c = c;
  }

  getC(): number {
    return this.c;
  }

  setC(c: number): void {
    this.c = c;
  }
}

class ClassB extends ClassA {
  b: number = 47;
  c: ClassC;

  constructor(a: number, b: number, c: number) {
    super(a);
    this.b = b;
    this.c = new ClassC(c);
  }

  getB(): number {
    return this.b;
  }

  setB(b: number): void {
    this.b = b;
  }

  getC(): number {
    return this.c.getC();
  }

  setC(c: number): void {
    return this.c.setC(c);
  }
}


@Entry
@Component
struct MyView {
  @State b: ClassB = new ClassB(10, 20, 30);

  build() {
    Column({ space: 10 }) {
      Text(`a: ${this.b.a}`)
      Button("Change ClassA.a")
        .onClick(() => {
          this.b.a += 1;
        })

      Text(`b: ${this.b.b}`)
      Button("Change ClassB.b")
        .onClick(() => {
          this.b.b += 1;
        })

      Text(`c: ${this.b.c.c}`)
      Button("Change ClassB.ClassC.c")
        .onClick(() => {
          // The <Text> component is not updated when clicked.
          this.b.c.c += 1;
        })
    }
  }
}
The UI is not updated when the last <Text> component Text(‘c: ${this.b.c.c}’) is clicked. This is because, \@State b: ClassB can observe only the changes of the this.b attribute, such as this.b.a, this.b.b, and this.b.c, but cannot observe the attributes nested in the attribute, that is, this.b.c.c (attribute c is an attribute of the ClassC object nested in b).
To observe the attributes of nested object ClassC, you need to make the following changes:
- Construct a child component for separate rendering of the ClassC instance. Then, in this child component, you can use \@ObjectLink or \@Prop to decorate c : ClassC. In general cases, use \@ObjectLink, unless local changes to the ClassC object are required.
- The nested ClassC object must be decorated by \@Observed. When a ClassC object is created in ClassB (ClassB(10, 20, 30) in this example), it is wrapped in the ES6 proxy. When the ClassC attribute changes (this.b.c.c += 1), the \@ObjectLink decorated variable is notified of the change.
Recommended
The following example uses \@Observed/\@ObjectLink to observe property changes for nested objects.
class ClassA {
  a: number;
  constructor(a: number) {
    this.a = a;
  }
  getA() : number {
    return this.a; }
  setA( a: number ) : void {
    this.a = a; }
}

@Observed
class ClassC {
  c: number;
  constructor(c: number) {
    this.c = c;
  }
  getC() : number {
    return this.c; }
  setC(c : number) : void {
    this.c = c; }
}

class ClassB extends ClassA {
  b: number = 47;
  c: ClassC;

  constructor(a: number, b: number, c: number) {
    super(a);
    this.b = b;
    this.c = new ClassC(c);
  }

  getB() : number {
    return this.b; }
  setB(b : number) : void {
    this.b = b; }
  getC() : number {
    return this.c.getC(); }
  setC(c : number) : void {
    return this.c.setC(c); }
}

@Component
struct ViewClassC {

    @ObjectLink c : ClassC;
    build() {
        Column({space:10}) {
            Text(`c: ${this.c.getC()}`)
            Button("Change C")
                .onClick(() => {
                    this.c.setC(this.c.getC()+1);
                })
        }
    }
}

@Entry
@Component
struct MyView {
    @State b : ClassB = new ClassB(10, 20, 30);

    build() {
        Column({space:10}) {
            Text(`a: ${this.b.a}`)
             Button("Change ClassA.a")
            .onClick(() => {
                this.b.a +=1;
            })

            Text(`b: ${this.b.b}`)
            Button("Change ClassB.b")
            .onClick(() => {
                this.b.b += 1;
            })

            ViewClassC({c: this.b.c})   // Equivalent to Text(`c: ${this.b.c.c}`)
            Button("Change ClassB.ClassC.c")
            .onClick(() => {
                this.b.c.c += 1;
            })
        }
     }
}
UI Not Updating on Attribute Changes in Complex Nested Objects
Not Recommended
The following example creates a child component with an \@ObjectLink decorated variable to render ParentCounter with nested attributes. SubCounter nested in ParentCounter is decorated with \@Observed.
let nextId = 1;
@Observed
class SubCounter {
  counter: number;
  constructor(c: number) {
    this.counter = c;
  }
}
@Observed
class ParentCounter {
  id: number;
  counter: number;
  subCounter: SubCounter;
  incrCounter() {
    this.counter++;
  }
  incrSubCounter(c: number) {
    this.subCounter.counter += c;
  }
  setSubCounter(c: number): void {
    this.subCounter.counter = c;
  }
  constructor(c: number) {
    this.id = nextId++;
    this.counter = c;
    this.subCounter = new SubCounter(c);
  }
}
@Component
struct CounterComp {
  @ObjectLink value: ParentCounter;
  build() {
    Column({ space: 10 }) {
      Text(`${this.value.counter}`)
        .fontSize(25)
        .onClick(() => {
          this.value.incrCounter();
        })
      Text(`${this.value.subCounter.counter}`)
        .onClick(() => {
          this.value.incrSubCounter(1);
        })
      Divider().height(2)
    }
  }
}
@Entry
@Component
struct ParentComp {
  @State counter: ParentCounter[] = [new ParentCounter(1), new ParentCounter(2), new ParentCounter(3)];
  build() {
    Row() {
      Column() {
        CounterComp({ value: this.counter[0] })
        CounterComp({ value: this.counter[1] })
        CounterComp({ value: this.counter[2] })
        Divider().height(5)
        ForEach(this.counter,
          (item: ParentCounter) => {
            CounterComp({ value: item })
          },
          (item: ParentCounter) => item.id.toString()
        )
        Divider().height(5)
        // First click event
        Text('Parent: incr counter[0].counter')
          .fontSize(20).height(50)
          .onClick(() => {
            this.counter[0].incrCounter();
            // The value increases by 10 each time the event is triggered.
            this.counter[0].incrSubCounter(10);
          })
        // Second click event
        Text('Parent: set.counter to 10')
          .fontSize(20).height(50)
          .onClick(() => {
            // The value cannot be set to 10, and the UI is not updated.
            this.counter[0].setSubCounter(10);
          })
        Text('Parent: reset entire counter')
          .fontSize(20).height(50)
          .onClick(() => {
            this.counter = [new ParentCounter(1), new ParentCounter(2), new ParentCounter(3)];
          })
      }
    }
  }
}
For the onClick event of Text(‘Parent: incr counter[0].counter’), this.counter[0].incrSubCounter(10) calls the incrSubCounter method to increase the counter value of SubCounter by 10. The UI is updated to reflect the change.
However, when this.counter[0].setSubCounter(10) is called in onClick of Text(‘Parent: set.counter to 10’), the counter value of SubCounter cannot be reset to 10.
incrSubCounter and setSubCounter are functions of the same SubCounter. The UI can be correctly updated when incrSubCounter is called for the first click event. However, the UI is not updated when setSubCounter is called for the second click event. Actually neither incrSubCounter nor setSubCounter can trigger an update of Text(‘${this.value.subCounter.counter}’). This is because \@ObjectLink value: ParentCounter can only observe the attributes of ParentCounter, and this.value.subCounter.counter is an attribute of SubCounter and therefore cannot be observed.
However, when this.counter[0].incrCounter() is called for the first click event, it marks \@ObjectLink value: ParentCounter in the CounterComp component as changed. In this case, the update of Text(‘${this.value.subCounter.counter}’) is triggered. If this.counter[0].incrCounter() is deleted from the first click event, the UI cannot be updated.
Recommended
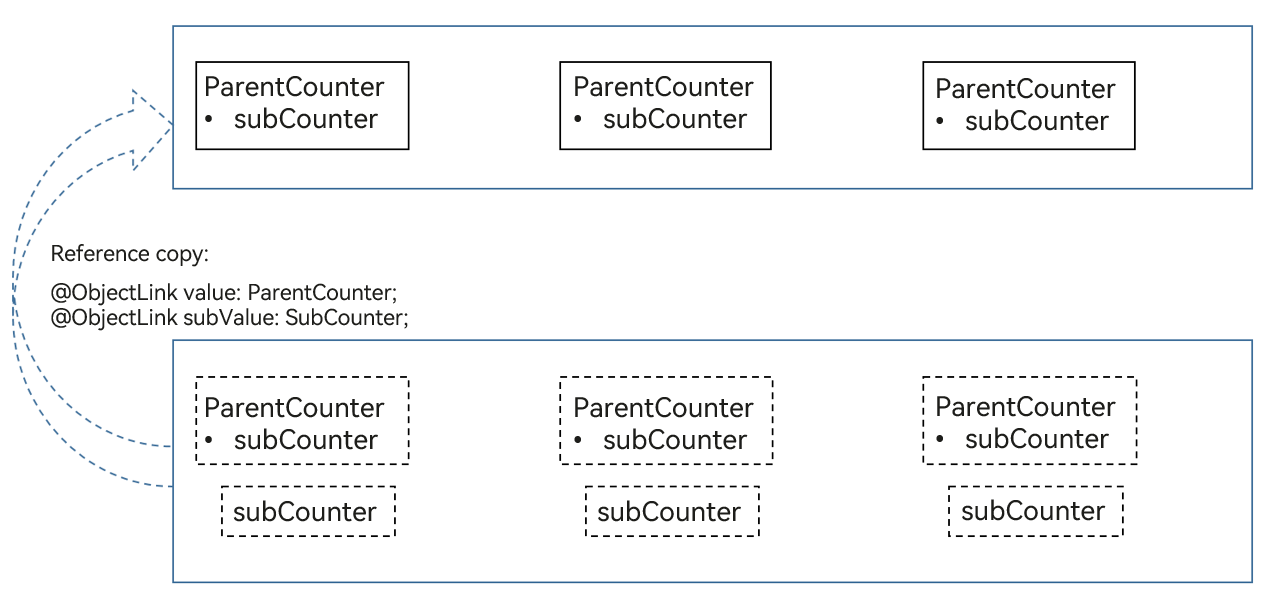
To solve the preceding problem, you can use the following method to directly observe the attributes in SubCounter so that the this.counter[0].setSubCounter(10) API works:
@ObjectLink value: ParentCounter = new ParentCounter(0);
@ObjectLink subValue: SubCounter = new SubCounter(0);
This approach enables \@ObjectLink to serve as a proxy for the attributes of the ParentCounter and SubCounter classes. In this way, the attribute changes of the two classes can be observed and trigger UI update. Even if this.counter[0].incrCounter() is deleted, the UI can be updated correctly.
This method can be used to implement “two-layer” observation, that is, observation of external objects and internal nested objects. However, this method can only be used for the \@ObjectLink decorator and cannot be used for \@Prop (\@Prop passes objects through deep copy). For details, see the differences between @Prop and @ObjectLink.
let nextId = 1;
@Observed
class SubCounter {
  counter: number;
  constructor(c: number) {
    this.counter = c;
  }
}
@Observed
class ParentCounter {
  id: number;
  counter: number;
  subCounter: SubCounter;
  incrCounter() {
    this.counter++;
  }
  incrSubCounter(c: number) {
    this.subCounter.counter += c;
  }
  setSubCounter(c: number): void {
    this.subCounter.counter = c;
  }
  constructor(c: number) {
    this.id = nextId++;
    this.counter = c;
    this.subCounter = new SubCounter(c);
  }
}
@Component
struct CounterComp {
  @ObjectLink value: ParentCounter;
  @ObjectLink subValue: SubCounter;
  build() {
    Column({ space: 10 }) {
      Text(`${this.value.counter}`)
        .fontSize(25)
        .onClick(() => {
          this.value.incrCounter();
        })
      Text(`${this.subValue.counter}`)
        .onClick(() => {
          this.subValue.counter += 1;
        })
      Divider().height(2)
    }
  }
}
@Entry
@Component
struct ParentComp {
  @State counter: ParentCounter[] = [new ParentCounter(1), new ParentCounter(2), new ParentCounter(3)];
  build() {
    Row() {
      Column() {
        CounterComp({ value: this.counter[0], subValue: this.counter[0].subCounter })
        CounterComp({ value: this.counter[1], subValue: this.counter[1].subCounter })
        CounterComp({ value: this.counter[2], subValue: this.counter[2].subCounter })
        Divider().height(5)
        ForEach(this.counter,
          (item: ParentCounter) => {
            CounterComp({ value: item, subValue: item.subCounter })
          },
          (item: ParentCounter) => item.id.toString()
        )
        Divider().height(5)
        Text('Parent: reset entire counter')
          .fontSize(20).height(50)
          .onClick(() => {
            this.counter = [new ParentCounter(1), new ParentCounter(2), new ParentCounter(3)];
          })
        Text('Parent: incr counter[0].counter')
          .fontSize(20).height(50)
          .onClick(() => {
            this.counter[0].incrCounter();
            this.counter[0].incrSubCounter(10);
          })
        Text('Parent: set.counter to 10')
          .fontSize(20).height(50)
          .onClick(() => {
            this.counter[0].setSubCounter(10);
          })
      }
    }
  }
}
Differences Between \@Prop and \@ObjectLink
In the following example, the \@ObjectLink decorated variable is a reference to the data source. That is, this.value.subValue and this.subValue are different references of the same object. Therefore, when the click handler of CounterComp is clicked, both this.value.subCounter.counter and this.subValue.counter change, and the corresponding component Text (this.subValue.counter: ${this.subValue.counter}) is re-rendered.
let nextId = 1;

@Observed
class SubCounter {
  counter: number;
  constructor(c: number) {
    this.counter = c;
  }
}

@Observed
class ParentCounter {
  id: number;
  counter: number;
  subCounter: SubCounter;
  incrCounter() {
    this.counter++;
  }
  incrSubCounter(c: number) {
    this.subCounter.counter += c;
  }
  setSubCounter(c: number): void {
    this.subCounter.counter = c;
  }
  constructor(c: number) {
    this.id = nextId++;
    this.counter = c;
    this.subCounter = new SubCounter(c);
  }
}

@Component
struct CounterComp {
  @ObjectLink value: ParentCounter;
  @ObjectLink subValue: SubCounter;
  build() {
    Column({ space: 10 }) {
      Text(`this.subValue.counter: ${this.subValue.counter}`)
        .fontSize(30)
      Text(`this.value.counter: increase 7 `)
        .fontSize(30)
        .onClick(() => {
          // click handler, Text(`this.subValue.counter: ${this.subValue.counter}`) will update
          this.value.incrSubCounter(7);
        })
      Divider().height(2)
    }
  }
}

@Entry
@Component
struct ParentComp {
  @State counter: ParentCounter[] = [new ParentCounter(1), new ParentCounter(2), new ParentCounter(3)];
  build() {
    Row() {
      Column() {
        CounterComp({ value: this.counter[0], subValue: this.counter[0].subCounter })
        CounterComp({ value: this.counter[1], subValue: this.counter[1].subCounter })
        CounterComp({ value: this.counter[2], subValue: this.counter[2].subCounter })
        Divider().height(5)
        ForEach(this.counter,
          (item: ParentCounter) => {
            CounterComp({ value: item, subValue: item.subCounter })
          },
          (item: ParentCounter) => item.id.toString()
        )
        Divider().height(5)
        Text('Parent: reset entire counter')
          .fontSize(20).height(50)
          .onClick(() => {
            this.counter = [new ParentCounter(1), new ParentCounter(2), new ParentCounter(3)];
          })
        Text('Parent: incr counter[0].counter')
          .fontSize(20).height(50)
          .onClick(() => {
            this.counter[0].incrCounter();
            this.counter[0].incrSubCounter(10);
          })
        Text('Parent: set.counter to 10')
          .fontSize(20).height(50)
          .onClick(() => {
            this.counter[0].setSubCounter(10);
          })
      }
    }
  }
}
Below shows \@ObjectLink working in action.
Not Recommended
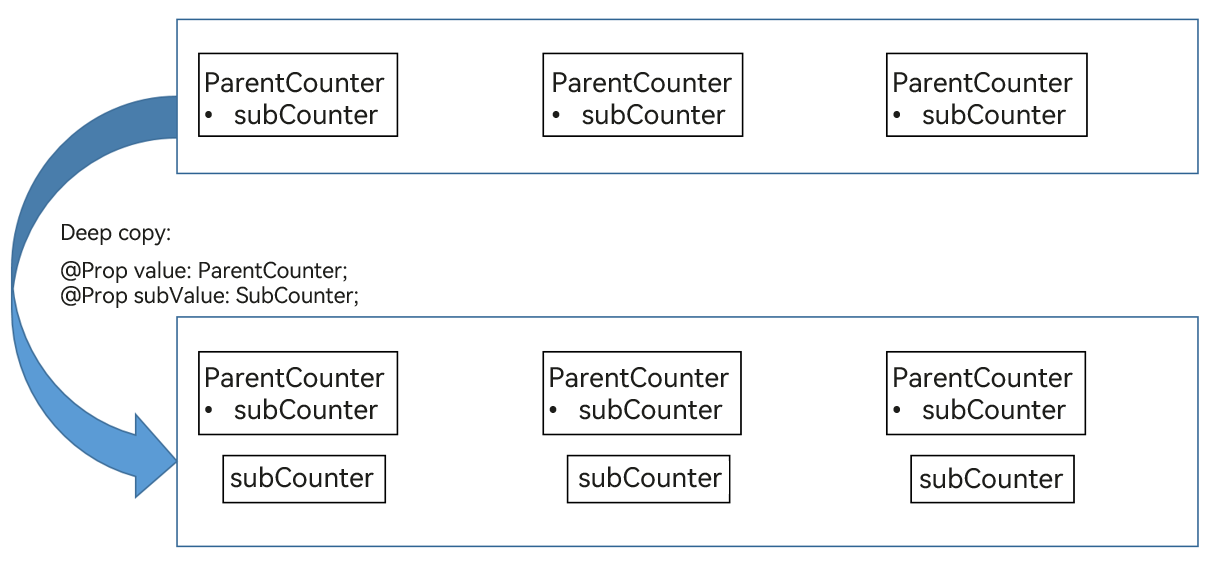
If \@Prop is used instead of \@ObjectLink, then: When the first click handler is clicked, the UI is updated properly; However, when the second onClick event occurs, the first Text component of CounterComp is not re-rendered, because \@Prop makes a local copy of the variable.
this.value.subCounter and this.subValue are not the same object. Therefore, the change of this.value.subCounter does not change the copy object of this.subValue, and Text(this.subValue.counter: ${this.subValue.counter}) is not re-rendered.
@Component
struct CounterComp {
  @Prop value: ParentCounter = new ParentCounter(0);
  @Prop subValue: SubCounter = new SubCounter(0);
  build() {
    Column({ space: 10 }) {
      Text(`this.subValue.counter: ${this.subValue.counter}`)
        .fontSize(20)
        .onClick(() => {
          // 1st click handler
          this.subValue.counter += 7;
        })
      Text(`this.value.counter: increase 7 `)
        .fontSize(20)
        .onClick(() => {
          // 2nd click handler
          this.value.incrSubCounter(7);
        })
      Divider().height(2)
    }
  }
}
Below shows \@Prop working in action.
Recommended
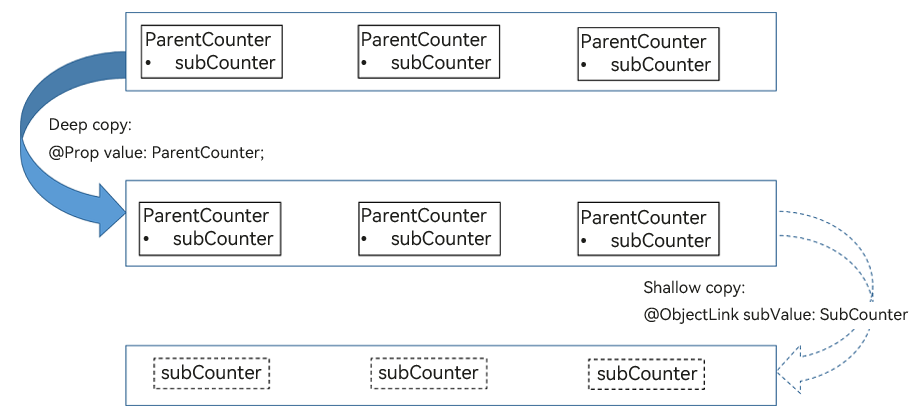
Make only one copy of \@Prop value: ParentCounter from ParentComp to CounterComp. Do not make another copy of SubCounter.
Use only one \@Prop counter: Counter in the CounterComp component.
Add another child component SubCounterComp that contains \@ObjectLink subCounter: SubCounter. This \@ObjectLink ensures that changes to the SubCounter object attributes are observed and the UI is updated properly.
\@ObjectLink subCounter: SubCounter shares the same SubCounter object with this.counter.subCounter of CounterComp.
let nextId = 1;

@Observed
class SubCounter {
  counter: number;
  constructor(c: number) {
    this.counter = c;
  }
}

@Observed
class ParentCounter {
  id: number;
  counter: number;
  subCounter: SubCounter;
  incrCounter() {
    this.counter++;
  }
  incrSubCounter(c: number) {
    this.subCounter.counter += c;
  }
  setSubCounter(c: number): void {
    this.subCounter.counter = c;
  }
  constructor(c: number) {
    this.id = nextId++;
    this.counter = c;
    this.subCounter = new SubCounter(c);
  }
}

@Component
struct SubCounterComp {
  @ObjectLink subValue: SubCounter;
  build() {
    Text(`SubCounterComp: this.subValue.counter: ${this.subValue.counter}`)
      .onClick(() => {
        // 2nd click handler
        this.subValue.incrSubCounter(7);
      })
  }
}
@Component
struct CounterComp {
  @ObjectLink value: ParentCounter;
  build() {
    Column({ space: 10 }) {
      Text(`this.value.incrCounter(): this.value.counter: ${this.value.counter}`)
        .fontSize(20)
        .onClick(() => {
          // 1st click handler
          this.value.incrCounter();
        })
      SubCounterComp({ subValue: this.value.subCounter })
      Text(`this.value.incrSubCounter()`)
        .onClick(() => {
          // 3rd click handler
          this.value.incrSubCounter(77);
        })
      Divider().height(2)
    }
  }
}
@Entry
@Component
struct ParentComp {
  @State counter: ParentCounter[] = [new ParentCounter(1), new ParentCounter(2), new ParentCounter(3)];
  build() {
    Row() {
      Column() {
        CounterComp({ value: this.counter[0] })
        CounterComp({ value: this.counter[1] })
        CounterComp({ value: this.counter[2] })
        Divider().height(5)
        ForEach(this.counter,
          (item: ParentCounter) => {
            CounterComp({ value: item })
          },
          (item: ParentCounter) => item.id.toString()
        )
        Divider().height(5)
        Text('Parent: reset entire counter')
          .fontSize(20).height(50)
          .onClick(() => {
            this.counter = [new ParentCounter(1), new ParentCounter(2), new ParentCounter(3)];
          })
        Text('Parent: incr counter[0].counter')
          .fontSize(20).height(50)
          .onClick(() => {
            this.counter[0].incrCounter();
            this.counter[0].incrSubCounter(10);
          })
        Text('Parent: set.counter to 10')
          .fontSize(20).height(50)
          .onClick(() => {
            this.counter[0].setSubCounter(10);
          })
      }
    }
  }
}
Below shows the copy relationship.
Application Not Allowed to Change State Variables During Rendering
Before learning this example, keep in mind that, in ArkUI state management, UI update is driven by state.

Therefore, state variables cannot be directly changed in the build() or \@Builder decorated method of a custom component, as this may cause loop rendering risks. The following uses the build() method as an example.
Not Recommended
In the following example, Text(‘${this.count++}’) directly changes the state variable in the build() method.
@Entry
@Component
struct CompA {
  @State col1: Color = Color.Yellow;
  @State col2: Color = Color.Green;
  @State count: number = 1;
  build() {
    Column() {
      // Do not directly change the value of count in the Text component.
      Text(`${this.count++}`)
        .width(50)
        .height(50)
        .fontColor(this.col1)
        .onClick(() => {
          this.col2 = Color.Red;
        })
      Button("change col1").onClick(() =>{
        this.col1 = Color.Pink;
      })
    }
    .backgroundColor(this.col2)
  }
}
In ArkUI, the full and minimum updates of Text(‘${this.count++}’) impose different effects:
Full update: ArkUI may fall into an infinite re-rendering loop because each rendering of the Text component changes the application state and causes the next rendering to start. When this.col2 is changed, the entire build function is executed. As a result, the text bound to Text(${this.count++}) is also changed. Each time Text(${this.count++}) is rendered, the this.count state variable is updated, and a new round of build execution follows, resulting in an infinite loop.
Minimum update: When this.col2 is changed, only the Column component is updated, and the Text component remains unchanged. When this.col1 is changed, the entire Text component is updated and all of its attribute functions are executed. As a result, the value of ${this.count++} in the Text component is changed. Currently, the UI is updated by component. If an attribute of a component changes, the entire component is updated. Therefore, the overall update link is as follows: this.col2 = Color.Red - > Text component update - > this.count++ - > Text component update.
Recommended
When possible, perform the count++ operation in the event handler.
@Entry
@Component
struct CompA {
  @State col1: Color = Color.Yellow;
  @State col2: Color = Color.Green;
  @State count: number = 1;
  build() {
    Column() {
      Text(`${this.count}`)
        .width(50)
        .height(50)
        .backgroundColor(this.col1)
        .onClick(() => {
          this.count++;
        })
    }
    .backgroundColor(this.col2)
  }
}
The behavior of changing the application state in the build function may be more covert than that in the preceding example. The following are some examples:
Changing the state variable within the \@Builder, \@Extend, or \@Styles decorated method
Changing the application state variable in the function called during parameter calculation, for example, Text(‘${this.calcLabel()}’)
Modifying the current array: In the following code snippet, sort() changes the array this.arr, and the subsequent filter method returns a new array.
@State arr : Array<...> = [ ... ];
ForEach(this.arr.sort().filter(...),
  item => {
  ...
})
In the correct invoking sequence, filter, which returns a new array, is called before sort(). In this way, the sort() method does not change the array this.arr.
ForEach(this.arr.filter(...).sort(),
  item => {
  ...
})
Forcibly Updating Data Through State Variables
Not Recommended
@Entry
@Component
struct CompA {
  @State needsUpdate: boolean = true;
  realState1: Array<number> = [4, 1, 3, 2]; // No state variable decorator is used.
  realState2: Color = Color.Yellow;

  updateUI1(param: Array<number>): Array<number> {
    const triggerAGet = this.needsUpdate;
    return param;
  }
  updateUI2(param: Color): Color {
    const triggerAGet = this.needsUpdate;
    return param;
  }
  build() {
    Column({ space: 20 }) {
      ForEach(this.updateUI1(this.realState1),
        (item: Array<number>) => {
          Text(`${item}`)
        })
      Text("add item")
        .onClick(() => {
          // Changing realState1 does not trigger UI update.
          this.realState1.push(this.realState1[this.realState1.length-1] + 1);

          // Trigger the UI update.
          this.needsUpdate = !this.needsUpdate;
        })
      Text("chg color")
        .onClick(() => {
          // Changing realState2 does not trigger UI update.
          this.realState2 = this.realState2 == Color.Yellow ? Color.Red : Color.Yellow;

          // Trigger the UI update.
          this.needsUpdate = !this.needsUpdate;
        })
    }.backgroundColor(this.updateUI2(this.realState2))
    .width(200).height(500)
  }
}
The preceding example has the following pitfalls:
The application wants to control the UI update logic, but in ArkUI, the UI update logic should be implemented by the framework detecting changes to the application state variables.
this.needsUpdate is a custom state variable that should be applied only to the UI component to which it is bound. Because this.realState1 and this.realState2 are regular variables (not decorated), their changes do not trigger UI update.
However, in this application, the user attempts to update the two regular variables through this.needsUpdate. This approach is nonviable and may result in poor update performance: The change of this.needsUpdate will cause ForEach to update, even if the original intent is to update only the background color.
Recommended
To address this issue, decorate the realState1 and realState2 variables with \@State. Then, the variable needsUpdate is no longer required.
@Entry
@Component
struct CompA {
  @State realState1: Array<number> = [4, 1, 3, 2];
  @State realState2: Color = Color.Yellow;
  build() {
    Column({ space: 20 }) {
      ForEach(this.realState1,
        (item: Array<number>) => {
          Text(`${item}`)
        })
      Text("add item")
        .onClick(() => {
          // Changing realState1 triggers UI update.
          this.realState1.push(this.realState1[this.realState1.length-1] + 1);
        })
      Text("chg color")
        .onClick(() => {
          // Changing realState2 triggers UI update.
          this.realState2 = this.realState2 == Color.Yellow ? Color.Red : Color.Yellow;
        })
    }.backgroundColor(this.realState2)
    .width(200).height(500)
  }
}
Component Reuse
If @Prop is nested with too many layers of data, garbage collection and increased memory usage caused by deep copy will follow, resulting in performance issues. In the following examples, using @Reusable to pass data from the parent component to the child component is recommended, and nesting @Prop with more than five layers of data is not recommended.
Not Recommended
// The following is the data structure of a nested class object.
@Observed
class ClassA {
  public title: string;

  constructor(title: string) {
    this.title = title;
  }
}

@Observed
class ClassB {
  public name: string;
  public a: ClassA;

  constructor(name: string, a: ClassA) {
    this.name = name;
    this.a = a;
  }
}

@Observed
class ClassC {
  public name: string;
  public b: ClassB;

  constructor(name: string, b: ClassB) {
    this.name = name;
    this.b = b;
  }
}

@Observed
class ClassD {
  public name: string;
  public c: ClassC;

  constructor(name: string, c: ClassC) {
    this.name = name;
    this.c = c;
  }
}

@Observed
class ClassE {
  public name: string;
  public d: ClassD;

  constructor(name: string, d: ClassD) {
    this.name = name;
    this.d = d;
  }
}
The following component hierarchy presents a data structure of nested @Prop.
@Entry
@Component
struct Parent {
  @State vote: ClassE = new ClassE('Hi', new ClassD('OpenHarmony', new ClassC('Hello', new ClassB('World', new ClassA('Peace')))))

  build() {
    Column() {
      Button('change')
        .onClick(() => {
          this.vote.name = "Hello"
        })
      Child({ voteOne: this.vote })
    }
  }
}

@Component
struct Child {
  @ObjectLink voteOne: ClassE
  build() {
    Column() {
      Text(this.voteOne.name).fontSize(24).fontColor(Color.Red).margin(50)
        .onClick(() => {
          console.log('this.voteOne.name:' + this.voteOne.name);
          this.voteOne.name = 'Bye'
        })
      ChildOne({voteTwo:this.voteOne.d})
    }
  }
}

@Component
struct ChildOne {
  @ObjectLink voteTwo: ClassD
  build() {
    Column() {
      Text(this.voteTwo.name).fontSize(24).fontColor(Color.Red).margin(50)
        .onClick(() => {
          console.log('this.voteTwo.name:' + this.voteTwo.name);
          this.voteTwo.name = 'Bye Bye'
        })
      ChildTwo({voteThree:this.voteTwo.c})
    }
  }
}

@Component
struct ChildTwo {
  @ObjectLink voteThree: ClassC
  build() {
    Column() {
      Text(this.voteThree.name).fontSize(24).fontColor(Color.Red).margin(50)
        .onClick(() => {
          console.log('this.voteThree.name:' + this.voteThree.name);
          this.voteThree.name = 'Bye Bye Bye'
        })
      ChildThree({voteFour:this.voteThree.b})
    }
  }
}

@Component
struct ChildThree {
  @ObjectLink voteFour: ClassB
  build() {
    Column() {
      Text(this.voteFour.name).fontSize(24).fontColor(Color.Red).margin(50)
        .onClick(() => {
          console.log('this.voteFour.name:' + this.voteFour.name);
          this.voteFour.name = 'Bye Bye Bye Bye'
        })
      ChildFour({voteFive:this.voteFour.a})
    }
  }
}

@Component
struct ChildFour {
  @ObjectLink voteFive: ClassA
  build() {
    Column() {
      Text(this.voteFive.title).fontSize(24).fontColor(Color.Red).margin(50)
        .onClick(() => {
          console.log('this.voteFive.title:' + this.voteFive.title);
          this.voteFive.title = 'Bye Bye Bye Bye Bye'
        })
    }
  }
}
Recommended
In component reuse scenarios, if you do not want to synchronize the data of a child component to the parent component, consider using aboutToReuse in @Reusable to pass data from the parent component to the child component.
// The following is the data structure of a nested class object.
@Observed
class ClassA {
  public title: string;

  constructor(title: string) {
    this.title = title;
  }
}

@Observed
class ClassB {
  public name: string;
  public a: ClassA;

  constructor(name: string, a: ClassA) {
    this.name = name;
    this.a = a;
  }
}

@Observed
class ClassC {
  public name: string;
  public b: ClassB;

  constructor(name: string, b: ClassB) {
    this.name = name;
    this.b = b;
  }
}

@Observed
class ClassD {
  public name: string;
  public c: ClassC;

  constructor(name: string, c: ClassC) {
    this.name = name;
    this.c = c;
  }
}

@Observed
class ClassE {
  public name: string;
  public d: ClassD;

  constructor(name: string, d: ClassD) {
    this.name = name;
    this.d = d;
  }
}
The following component hierarchy presents a data structure of @Reusable.
// The following is the data structure of a nested class object.
@Observed
class ClassA {
  public title: string;

  constructor(title: string) {
    this.title = title;
  }
}

@Observed
class ClassB {
  public name: string;
  public a: ClassA;

  constructor(name: string, a: ClassA) {
    this.name = name;
    this.a = a;
  }
}

@Observed
class ClassC {
  public name: string;
  public b: ClassB;

  constructor(name: string, b: ClassB) {
    this.name = name;
    this.b = b;
  }
}

@Observed
class ClassD {
  public name: string;
  public c: ClassC;

  constructor(name: string, c: ClassC) {
    this.name = name;
    this.c = c;
  }
}

@Observed
class ClassE {
  public name: string;
  public d: ClassD;

  constructor(name: string, d: ClassD) {
    this.name = name;
    this.d = d;
  }
}
@Entry
@Component
struct Parent {
  @State vote: ClassE = new ClassE('Hi', new ClassD('OpenHarmony', new ClassC('Hello', new ClassB('World', new ClassA('Peace')))))

  build() {
    Column() {
      Button('change')
        .onClick(() => {
          this.vote.name = "Hello"
        })
        .reuseId(Child.name)
      Child({voteOne: this.vote})
    }
  }
}

@Reusable
@Component
struct Child {
  @State voteOne: ClassE = new ClassE('voteOne', new ClassD('OpenHarmony', new ClassC('Hello', new ClassB('World', new ClassA('Peace')))))

  aboutToReuse(params: ClassE) {
    this.voteOne = params
  }
  build() {
    Column() {
      Text(this.voteOne.name).fontSize(24).fontColor(Color.Red).margin(50)
        .onClick(() => {
          console.error('this.voteOne.name:' + this.voteOne.name);
          this.voteOne.name = 'Bye'
        })
        .reuseId(ChildOne.name)
      ChildOne({voteTwo: this.voteOne.d})
    }
  }
}

@Reusable
@Component
struct ChildOne {
  @State voteTwo: ClassD = new ClassD('voteTwo', new ClassC('Hello', new ClassB('World', new ClassA('Peace'))))
  aboutToReuse(params: ClassD){
    this.voteTwo = params
  }
  build() {
    Column() {
      Text(this.voteTwo.name).fontSize(24).fontColor(Color.Red).margin(50)
        .onClick(() => {
          console.error('this.voteTwo.name:' + this.voteTwo.name);
          this.voteTwo.name = 'Bye Bye'
        })
        .reuseId(ChildTwo.name)
      ChildTwo({voteThree: this.voteTwo.c})
    }
  }
}

@Reusable
@Component
struct ChildTwo {
  @State voteThree: ClassC = new ClassC('voteThree', new ClassB('World', new ClassA('Peace')))
  aboutToReuse(params: ClassC){
    this.voteThree = params

  }
  build() {
    Column() {
      Text(this.voteThree.name).fontSize(24).fontColor(Color.Red).margin(50)
        .onClick(() => {
          console.log('this.voteThree.name:' + this.voteThree.name);
          this.voteThree.name = 'Bye Bye Bye'
        })
        .reuseId(ChildThree.name)
      ChildThree({voteFour: this.voteThree.b})
    }
  }
}

@Reusable
@Component
struct ChildThree {
  @State voteFour: ClassB = new ClassB('voteFour', new ClassA('Peace'))
  aboutToReuse(params: ClassB){
    this.voteFour = params

  }
  build() {
    Column() {
      Text(this.voteFour.name).fontSize(24).fontColor(Color.Red).margin(50)
        .onClick(() => {
          console.log('this.voteFour.name:' + this.voteFour.name);
          this.voteFour.name = 'Bye Bye Bye Bye'
        })
        .reuseId(ChildFour.name)
      ChildFour({voteFive: this.voteFour.a})
    }
  }
}

@Reusable
@Component
struct ChildFour {
  @State voteFive: ClassA = new ClassA('voteFive')
  aboutToReuse(params: ClassA){
    this.voteFive = params

  }
  build() {
    Column() {
      Text(this.voteFive.title).fontSize(24).fontColor(Color.Red).margin(50)
        .onClick(() => {
          console.log('this.voteFive.title:' + this.voteFive.title);
          this.voteFive.title = 'Bye Bye Bye Bye Bye'
        })
    }
  }
}
你可能感兴趣的鸿蒙文章
harmony 鸿蒙app.json5 Configuration File
harmony 鸿蒙Internal Structure of the app Tag
harmony 鸿蒙Application Configuration File Overview (FA Model)
harmony 鸿蒙Application Configuration File Overview (Stage Model)
harmony 鸿蒙Application Installation and Uninstallation Process
harmony 鸿蒙Application Package Overview
harmony 鸿蒙Application Package Structure in FA Model
- 所属分类: 后端技术
- 本文标签:
热门推荐
-
2、 优质文章
-
3、 gt
-
7、 openharmony
-
9、 golang
-
10、 Vue中input框自动聚焦