harmony 鸿蒙Getting Started with ArkTS in FA Model
Getting Started with ArkTS in FA Model
NOTE
To use ArkTS, your DevEco Studio must be V3.0.0.601 Beta1 or later.
For best possible results, use DevEco Studio V3.1.0.100 for your development.
Creating an ArkTS Project
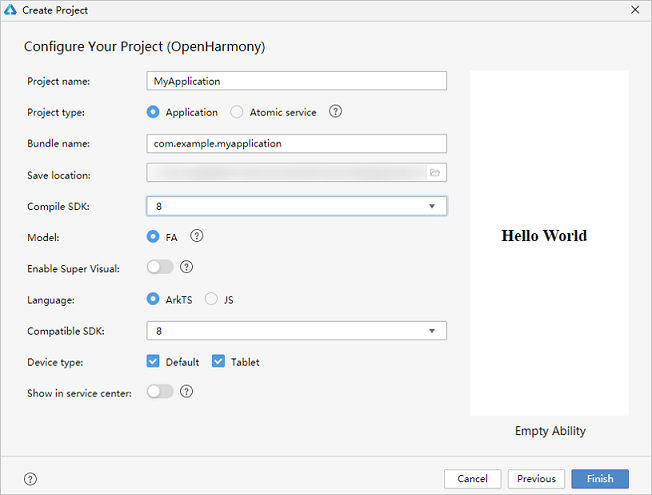
- If you are opening DevEco Studio for the first time, click Create Project. If a project is already open, choose File > New > Create Project from the menu bar. On the OpenHarmony tab of the Choose Your Ability Template page, select Empty Ability and click Next.

- In the project configuration page, set Compile SDK to 8 or 9 (in the latter case, you also need to set Model to FA) and Language to ArkTS and retain the default values for other parameters.
NOTE
If you are using DevEco Studio V3.0 Beta3 or later, you can use the low-code development mode apart from the traditional coding approach.
On the low-code development pages, you can design your application UI in an efficient, intuitive manner, with a wide array of UI editing features.
To use the low-code development mode, turn on Enable Super Visual on the page shown above.
- Click Finish. DevEco Studio will automatically generate the sample code and resources that match your project type. Wait until the project is created.
ArkTS Project Directory Structure (FA Model)
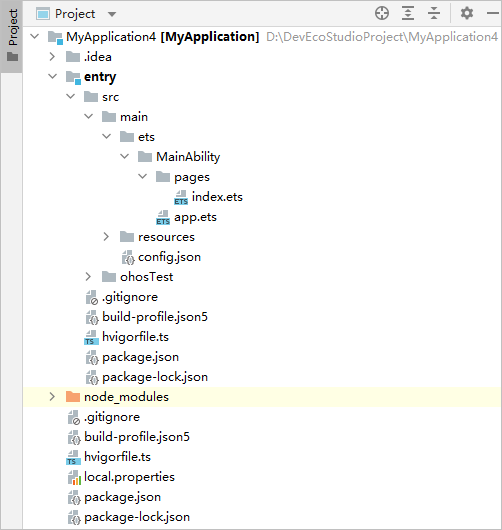
entry: OpenHarmony project module, which can be built into an OpenHarmony Ability Package (HAP).
- src > main > ets: a collection of eTS source code.
- src > main > ets > MainAbility: entry to your application/service.
- src > main > ets > MainAbility > pages: pages contained in MainAbility.
- src > main > ets > MainAbility > pages > index.ets: the first page in the pages list, also referred to as the entry to the application.
- src > main > ets > MainAbility > app.ets: ability lifecycle file.
- src > main > resources: a collection of resource files used by your application/service, such as graphics, multimedia, character strings, and layout files. For details about resource files, see Resource Categories and Access.
- src > main > config.json: module configuration file. This file describes the global configuration information of the application/service, the device-specific configuration information, and the configuration information of the HAP file. For details, see Application Configuration File Overview (FA Model).
- build-profile.json5: current module information and build configuration options, including buildOption and targets.
- hvigorfile.ts: module-level build script. You can customize related tasks and code implementation.
build-profile.json5: application-level configuration information, including the signature and product configuration.
hvigorfile.ts: application-level build script.
Building the First Page
- Use the <Text> component.
After the project synchronization is complete, choose entry > src > main > ets > MainAbility > pages in the Project window and open the index.ets file. You can see that the file contains a <Text> component. The sample code in the index.ets file is shown below:
   // index.ets
   @Entry
   @Component
   struct Index {
     @State message: string = 'Hello World'

     build() {
       Row() {
         Column() {
           Text(this.message)
             .fontSize(50)
             .fontWeight(FontWeight.Bold)
         }
         .width('100%')
       }
       .height('100%')
     }
   }
- Add a <Button> component.
On the default page, add a <Button> component to respond to user clicks and implement redirection to another page. The sample code in the index.ets file is shown below:
   // index.ets
   @Entry
   @Component
   struct Index {
     @State message: string = 'Hello World'

     build() {
       Row() {
         Column() {
           Text(this.message)
             .fontSize(50)
             .fontWeight(FontWeight.Bold)
           // Add a button to respond to user clicks.
           Button() {
             Text('Next')
               .fontSize(30)
               .fontWeight(FontWeight.Bold)
           }
           .type(ButtonType.Capsule)
           .margin({
             top: 20
           })
           .backgroundColor('#0D9FFB')
           .width('40%')
           .height('5%')
         }
         .width('100%')
       }
       .height('100%')
     }
   }
- On the toolbar in the upper right corner of the editing window, click Previewer. Below is how the first page looks in the Previewer.

Building the Second Page
Create the second page.
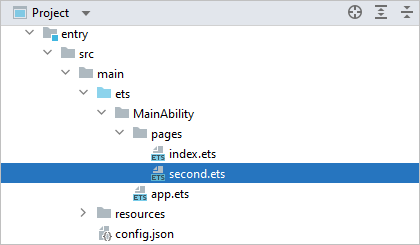
- Create the second page file: In the Project window, choose entry > src > main > ets > MainAbility. Right-click the pages folder, choose New > ArkTS File, name the page second, and click Finish. Below is the structure of the second folder.
NOTE
You can also right-click the pages folder and choose New > Page from the shortcut menu. In this scenario, you do not need to manually configure page routes. - Configure the route for the second page, by setting pages/second under module - js - pages in the config.json file. The sample code is as follows:
{ "module": { "js": [ { "pages": [ "pages/index", "pages/second" ] } ] } }- Create the second page file: In the Project window, choose entry > src > main > ets > MainAbility. Right-click the pages folder, choose New > ArkTS File, name the page second, and click Finish. Below is the structure of the second folder.
Add <Text> and <Button> components.
Add <Text> and <Button> components and set their styles, as you do for the first page. The sample code in the second.ets file is shown below:
   // second.ets
   @Entry
   @Component
   struct Second {
     @State message: string = 'Hi there'

     build() {
       Row() {
         Column() {
           Text(this.message)
             .fontSize(50)
             .fontWeight(FontWeight.Bold)
           Button() {
             Text('Back')
               .fontSize(25)
               .fontWeight(FontWeight.Bold)
           }
           .type(ButtonType.Capsule)
           .margin({
             top: 20
           })
           .backgroundColor('#0D9FFB')
           .width('40%')
           .height('5%')
         }
         .width('100%')
       }
       .height('100%')
     }
   }
Implementing Page Redirection
You can implement page redirection through the page router, which finds the target page based on the page URL. Import the router module and then perform the steps below:
- Implement redirection from the first page to the second page.
In the index.ets file of the first page, bind the onClick event to the Next button so that clicking the button redirects the user to the second page. The sample code in the index.ets file is shown below:
   // index.ets
   // Import the router module.
   import router from '@ohos.router';

   @Entry
   @Component
   struct Index {
     @State message: string = 'Hello World'

     build() {
       Row() {
         Column() {
           Text(this.message)
             .fontSize(50)
             .fontWeight(FontWeight.Bold)
           // Add a button to respond to user clicks.
           Button() {
             Text('Next')
               .fontSize(30)
               .fontWeight(FontWeight.Bold)
           }
           .type(ButtonType.Capsule)
           .margin({
             top: 20
           })
           .backgroundColor('#0D9FFB')
           .width('40%')
           .height('5%')
           // Bind the onClick event to the Next button so that clicking the button redirects the user to the second page.
           .onClick(() => {
             router.push({ url: 'pages/second' })
             // In a project of API version 9, you can use the API below instead:
             // router.pushUrl({ url: 'pages/second' })

           })
         }
         .width('100%')
       }
       .height('100%')
     }
   }
- Implement redirection from the second page to the first page.
In the second.ets file of the second page, bind the onClick event to the Back button so that clicking the button redirects the user back to the first page. The sample code in the second.ets file is shown below:
   // second.ets
   // Import the router module.
   import router from '@ohos.router';

   @Entry
   @Component
   struct Second {
     @State message: string = 'Hi there'

     build() {
       Row() {
         Column() {
           Text(this.message)
             .fontSize(50)
             .fontWeight(FontWeight.Bold)
           Button() {
             Text('Back')
               .fontSize(25)
               .fontWeight(FontWeight.Bold)
           }
           .type(ButtonType.Capsule)
           .margin({
             top: 20
           })
           .backgroundColor('#0D9FFB')
           .width('40%')
           .height('5%')
           // Bind the onClick event to the Back button so that clicking the button redirects the user back to the first page.
           .onClick(() => {
             router.back()
           })
         }
         .width('100%')
       }
       .height('100%')
     }
   }
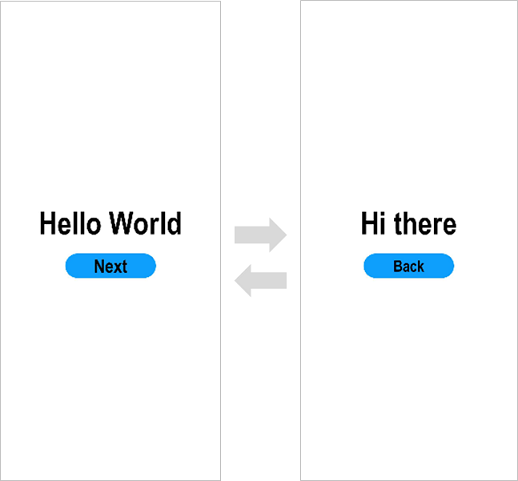
- Open the index.ets file and click
 in the Previewer to refresh the file. The display effect is shown in the figure below.
Running the Application on a Real Device
Connect the development board running the OpenHarmony standard system to the computer.
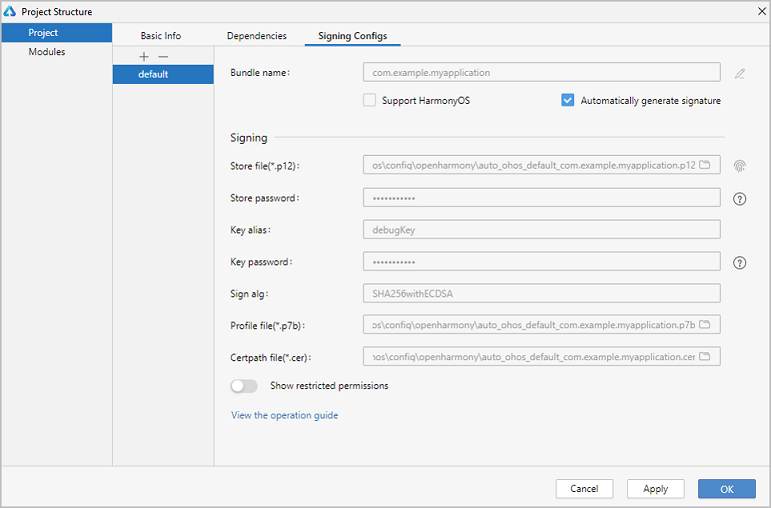
Choose File > Project Structure… > Project > SigningConfigs, and select Automatically generate signature. Wait until the automatic signing is complete, and click OK. See the following figure.
- On the toolbar in the upper right corner of the editing window, click
 . The display effect is shown in the figure below.
Congratulations! You have finished developing your OpenHarmony application in ArkTS in the FA model. To learn more about OpenHarmony application development, see Application Development Overview.
你可能感兴趣的鸿蒙文章
harmony 鸿蒙app.json5 Configuration File
harmony 鸿蒙Internal Structure of the app Tag
harmony 鸿蒙Application Configuration File Overview (FA Model)
harmony 鸿蒙Application Configuration File Overview (Stage Model)
harmony 鸿蒙Application Installation and Uninstallation Process
harmony 鸿蒙Application Package Overview
harmony 鸿蒙Application Package Structure in FA Model
- 所属分类: 后端技术
- 本文标签:
热门推荐
-
2、 优质文章
-
3、 gt
-
7、 openharmony
-
9、 golang
-
10、 Vue中input框自动聚焦