harmony 鸿蒙分布式相机开发指南
分布式相机开发指南
简介
OpenHarmony分布式相机通过打破硬件边界,实现了跨设备的摄像头能力协同。当搭载OpenHarmony系统的设备A与设备B完成组网后,设备A的应用可实时调用设备B的摄像头资源,获取对方影像(预览流/拍照流/录像流),且支持分辨率调节、参数同步等深度控制。这一功能在以下场景中具有突破性应用价值,例如: - 多视角协同创作 - 远程专家协作 - 沉浸式安防系统 - 分布式影音交互
基本概念
在进行分布式相机开发前,建议开发者查看下列章节,了解相关功能操作: - 应用跨设备连接 - 相机管理 - 申请相关权限 - 会话管理 - 拍照 - 录像
环境准备
环境要求
设备A和设备B之间需要组网成功。
搭建环境
- 安装DevEco Studio,要求版本在5.0及以上。
- 将public-SDK更新到API 16或以上,更新SDK的具体操作可参见更新指南。
- 用USB线缆将两台调测设备(设备A和设备B)连接到PC。
- 打开设备A和设备B的Wifi并连接到同一个接入点上,互相识别,连接并组网。连接组网的具体操作可参见创建会话并连接。
检验环境是否搭建成功
PC上执行shell命令:
  hdc shell
  hidumper -s 4700 -a "buscenter -l remote_device_info"
组网成功时可显示组网设备数量的信息,如“remote device num = 1”。
开发指导
通过OpenHarmony操作系统,将用户拥有的多个设备相机资源作为一个硬件池,为用户提供跨端使用相机的能力。
开发流程
分布式相机流程图建议如下:
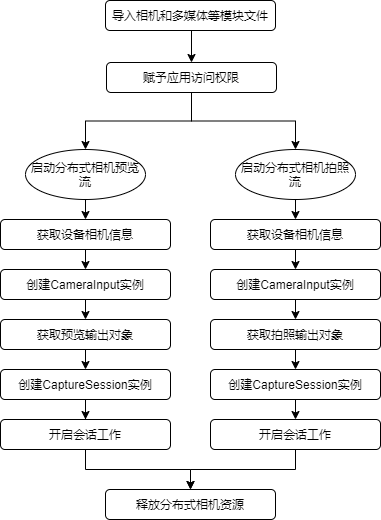
开发步骤
导入相机和多媒体等模块文件
  import { camera } from '@kit.CameraKit';
  import { media } from '@kit.MediaKit';
赋予应用访问权限
应用需申请权限,包括但不限于下列权限类型: - 图片和视频 ohos.permission.MEDIA_LOCATION - 文件读 ohos.permission.READ_MEDIA - 文件写 ohos.permission.WRITE_MEDIA - 相机 ohos.permission.CAMERA - 多设备协同 ohos.permission.DISTRIBUTED_DATASYNC
例如在UIAbility申请相关的访问权限,通过调用requestPermissionsFromUser()方法添加对应的权限类型。
  //EntryAbility.ets
  export default class EntryAbility extends UIAbility {
    onCreate(want, launchParam) {
      Logger.info('Sample_VideoRecorder', 'Ability onCreate,requestPermissionsFromUser');
      let permissionNames: Array<Permissions> = ['ohos.permission.MEDIA_LOCATION', 'ohos.permission.READ_MEDIA',
        'ohos.permission.WRITE_MEDIA', 'ohos.permission.CAMERA', 'ohos.permission.MICROPHONE', 'ohos.permission.DISTRIBUTED_DATASYNC'];
      abilityAccessCtrl.createAtManager().requestPermissionsFromUser(this.context, permissionNames).then((data)=> {
        console.log("testTag", data);
      })
        .catch((err : BusinessError) => {
          console.log("testTag", err.message);
        });
    }
启动分布式相机预览流及拍照流
1. 获取远端设备相机信息
应用组网成功后,需获取远端设备信息,通过getCameraManager()方法获取相机管理器实例,getSupportedCameras()方法获取支持指定的相机设备对象。
  private cameras?: Array<camera.CameraDevice>;
  private cameraManager?: camera.CameraManager;
  private cameraOutputCapability?: camera.CameraOutputCapability;
  private cameraIndex: number = 0;
  private curVideoProfiles?: Array<camera.VideoProfile>;

  function initCamera(): void {
    console.info('init remote camera called');
    if (this.cameraManager) {
      console.info('cameraManager already exits');
      return;
    }
    console.info('[camera] case to get cameraManager');
    this.cameraManager = camera.getCameraManager(globalThis.abilityContext);
    if (this.cameraManager) {
      console.info('[camera] case getCameraManager success');
    } else {
      console.info('[camera] case getCameraManager failed');
      return;
    }
    this.cameras = this.cameraManager.getSupportedCameras();
    if (this.cameras) {
      console.info('[camera] case getCameras success, size ', this.cameras.length);
      for (let i = 0; i < this.cameras.length; i++) {
        let came: camera.CameraDevice = this.cameras[i];
        console.info('[came] camera json:', JSON.stringify(came));
        if (came.connectionType == camera.ConnectionType.CAMERA_CONNECTION_REMOTE) {
          this.cameraIndex = i;
          this.cameraOutputCapability = this.cameraManager.getSupportedOutputCapability(came);
          this.curVideoProfiles = this.cameraOutputCapability.videoProfiles;
          console.info('init remote camera done'); //初始化远端摄像头成功
          break;
        }
      }
    } else {
      console.info('[camera] case getCameras failed');
    }
  }
2. 创建CameraInput实例
获取相机管理器实例和支持指定的相机设备对象后,通过createCameraInput()方法创建CameraInput实例。
  // create camera input
  async createCameraInput(): Promise<void> {
    console.log('createCameraInput called');
    if (this.cameras && this.cameras.length > 0) {
      let came: camera.CameraDevice = this.cameras[this.cameraIndex];
      console.log('[came]createCameraInput camera json:', JSON.stringify(came));
      this.cameraInput = this.cameraManager?.createCameraInput(came);
      if (this.cameraInput) {
        console.log('[camera] case createCameraInput success');
        await this.cameraInput.open().then(() => {
          console.log('[camera] case cameraInput.open() success');
        }).catch((err: Error) => {
          console.log('[camera] cameraInput.open then.error:', json.stringify(err));
        });
      } else {
        console.log('[camera] case createCameraInput failed');
        return;
      }
    }
  }
3. 获取预览输出对象
通过createPreviewOutput()方法创建预览输出对象。
  private previewOutput?: camera.PreviewOutput;
  private avConfig: media.AVRecorderConfig = {
    videoSourceType: media.VideoSourceType.VIDEO_SOURCE_TYPE_SURFACE_YUV,
    profile: this.avProfile,
    url: 'fd://',
  }

  // create camera preview
  async createPreviewOutput(): Promise<void> {
    console.log('createPreviewOutput called');
    if (this.cameraOutputCapability && this.cameraManager) {
      this.previewProfiles = this.cameraOutputCapability.previewProfiles;
      console.log('[camera] this.previewProfiles json ', json.stringify(this.previewProfiles));
      if (this.previewProfiles[0].format === camera.CameraFormat.CAMERA_FORMAT_YUV_420_SP) {
        console.log('[camera] case format is VIDEO_SOURCE_TYPE_SURFACE_YUV');
        this.avConfig.videoSourceType = media.VideoSourceType.VIDEO_SOURCE_TYPE_SURFACE_YUV;
      } else {
        console.log('[camera] case format is VIDEO_SOURCE_TYPE_SURFACE_ES');
        this.avConfig.videoSourceType = media.VideoSourceType.VIDEO_SOURCE_TYPE_SURFACE_ES;
      }
      this.previewOutput = this.cameraManager.createPreviewOutput(this.previewProfiles[0], this.surfaceId);
      if (!this.previewOutput) {
        console.log('create previewOutput failed!');
      }
      console.log('createPreviewOutput done');
    }
  }
4. 获取拍照输出对象
通过createPhotoOutput()方法创建拍照输出对象,通过createImageReceiver()方法创建ImageReceiver实例。
  import fileio from '@ohos.fileio';

  private photoReceiver?: image.ImageReceiver;
  private photoOutput?: camera.PhotoOutput;
  private mSaveCameraAsset: SaveCameraAsset = new SaveCameraAsset('Sample_VideoRecorder');

  async getImageFileFd(): Promise<void> {
    console.info'getImageFileFd called');
    this.mFileAssetId = await this.mSaveCameraAsset.createImageFd();
    this.fdPath = 'fd://' + this.mFileAssetId.toString();
    this.avConfig.url = this.fdPath;
    console.info('ImageFileFd is: ' + this.fdPath);
    console.info('getImageFileFd done');
  }

  // close file fd
  async closeFd(): Promise<void> {
    console.info('case closeFd called');
    if (this.mSaveCameraAsset) {
      await this.mSaveCameraAsset.closeVideoFile();
      this.mFileAssetId = undefined;
      this.fdPath = undefined;
      console.info('case closeFd done');
    }
  }

  async createPhotoOutput() {
    const photoProfile: camera.Profile = {
      format: camera.CameraFormat.CAMERA_FORMAT_JPEG,
      size: {
        "width": 1280,
        "height": 720
      }
    }
    if (!this.cameraManager) {
      console.log('createPhotoOutput cameraManager is null')
    }
    if (!this.photoReceiver) {
      this.photoReceiver = image.createImageReceiver(photoProfile.size.width, photoProfile.size.height, photoProfile.format, 8)
      this.photoReceiver.on("imageArrival",()=>{
        this.photoReceiver?.readNextImage((err,image)=>{
          if (err||image === undefined) {
            console.log('photoReceiver imageArrival on error')
            return
          }
          image.getComponent(4, async (err, img) => {
            if (err||img === undefined) {
              console.log('image getComponent on error')
              return
            }
            await this.getImageFileFd()
            fileio.write(this.mFileAssetId, img.byteBuffer)
            await this.closeFd()
            await image.release()
            console.log('photoReceiver image.getComponent save success')
          })
        })
      })
        await this.photoReceiver.getReceivingSurfaceId().then((surfaceId: string) => {
          this.photoOutput = this.cameraManager?.createPhotoOutput(photoProfile, surfaceId)
          if (!this.photoOutput) {
            console.log('cameraManager.createPhotoOutput on error')
          }
          console.log('cameraManager.createPhotoOutput success')
          this.photoOutput?.on("captureStart", (err, captureId) => {
            console.log('photoOutput.on captureStart')
          })
        }).catch((err: Error) => {
          console.error('photoReceiver.getReceivingSurfaceId on error:' + err)
        })
      }
    }
5. 创建CaptureSession实例
通过createCaptureSession()方法创建CaptureSession实例。调用beginConfig()方法开始配置会话,使用addInput()和addOutput()方法将CameraInput()和CameraOutput()加入到会话,最后调用commitConfig()方法提交配置信息,通过Promise获取结果。
  private captureSession?: camera.CaptureSession;

  function failureCallback(error: BusinessError): Promise<void> {
    console.log('case failureCallback called,errMessage is ', json.stringify(error));
  }

  function catchCallback(error: BusinessError): Promise<void> {
    console.log('case catchCallback called,errMessage is ', json.stringify(error));
  }

  // create camera capture session
  async createCaptureSession(): Promise<void> {
    console.log('createCaptureSession called');
    if (this.cameraManager) {
      this.captureSession = this.cameraManager.createCaptureSession();
      if (!this.captureSession) {
        console.log('createCaptureSession failed!');
        return
      }
      try {
        this.captureSession.beginConfig();
        this.captureSession.addInput(this.cameraInput);
      } catch (e) {
        console.log('case addInput error:' + json.stringify(e));
      }
      try {
        this.captureSession.addOutput(this.previewOutput);
      } catch (e) {
        console.log('case addOutput error:' + json.stringify(e));
      }
      await this.captureSession.commitConfig().then(() => {
        console.log('captureSession commitConfig success');
      }, this.failureCallback).catch(this.catchCallback);
    }
  }
6. 开启会话工作
通过CaptureSession实例上的start()方法开始会话工作,通过Promise获取结果。
  // start captureSession
  async startCaptureSession(): Promise<void> {
    console.log('startCaptureSession called');
    if (!this.captureSession) {
      console.log('CaptureSession does not exists!');
      return
    }
    await this.captureSession.start().then(() => {
      console.log('case start captureSession success');
    }, this.failureCallback).catch(this.catchCallback);
  }
释放分布式相机资源
业务协同完毕后需及时结束协同状态,释放分布式相机资源。
  // 释放相机
  async releaseCameraInput(): Promise<void> {
    console.log('releaseCameraInput called');
    if (this.cameraInput) {
      this.cameraInput = undefined;
    }
    console.log('releaseCameraInput done');
  }

  // 释放预览
  async releasePreviewOutput(): Promise<void> {
    console.log('releasePreviewOutput called');
    if (this.previewOutput) {
      await this.previewOutput.release().then(() => {
        console.log('[camera] case main previewOutput release called');
      }, this.failureCallback).catch(this.catchCallback);
      this.previewOutput = undefined;
    }
    console.log('releasePreviewOutput done');
  }

  // 释放视频输出
  async releaseVideoOutput(): Promise<void> {
    console.log('releaseVideoOutput called');
    if (this.videoOutput) {
      await this.videoOutput.release().then(() => {
        console.log('[camera] case main videoOutput release called');
      }, this.failureCallback).catch(this.catchCallback);
      this.videoOutput = undefined;
    }
    console.log('releaseVideoOutput done');
  }

  // 停止拍照任务
  async stopCaptureSession(): Promise<void> {
    console.log('stopCaptureSession called');
    if (this.captureSession) {
      await this.captureSession.stop().then(() => {
        console.log('[camera] case main captureSession stop success');
      }, this.failureCallback).catch(this.catchCallback);
    }
    console.log('stopCaptureSession done');
  }

  // 释放拍照任务
  async releaseCaptureSession(): Promise<void> {
    console.log('releaseCaptureSession called');
    if (this.captureSession) {
      await this.captureSession.release().then(() => {
        console.log('[camera] case main captureSession release success');
      }, this.failureCallback).catch(this.catchCallback);
      this.captureSession = undefined;
    }
    console.log('releaseCaptureSession done');
  }

  // 释放相机资源
  async releaseCamera(): Promise<void> {
    console.log('releaseCamera called');
    await this.stopCaptureSession();
    await this.releaseCameraInput();
    await this.releasePreviewOutput();
    await this.releaseVideoOutput();
    await this.releaseCaptureSession();
    console.log('releaseCamera done');
  }
调测验证
应用侧开发完成后,可在设备A和设备B上安装应用,测试步骤如下:
- 设备A拉起设备B上的分布式摄像头并发起预览,设备A能接收到预览流。
- 设备A拉起设备B上的分布式摄像头并拍照,设备A能接收到照片。
常见问题
设备A应用无法拉起设备B摄像头
可能原因
设备间没有相互组网或者组网后中断了连接。
解决措施
设备A和设备B开启USB调试功能,用USB线连接设备和PC。执行shell命令:
  hdc shell
  hidumper -s 4700 -a "buscenter -l remote_device_info"
回显信息为 “remote device num = 0” 即为组网失败,请禁用再启用Wifi重新接入到同一个接入点上。组网成功后重新执行命令会显示正确组网设备数量的信息,如“remote device num = 1”。
你可能感兴趣的鸿蒙文章
harmony 鸿蒙Distributed Service Kit(分布式管理服务)
harmony 鸿蒙UIAbility与UIAbility连接开发指南
- 所属分类: 后端技术
- 本文标签:
热门推荐
-
2、 优质文章
-
3、 gt
-
7、 openharmony
-
9、 golang
-
10、 Vue中input框自动聚焦