harmony 鸿蒙使用Web组件加载页面
使用Web组件加载页面
页面加载是Web组件的基本功能。根据页面加载数据来源可以分为三种常用场景,包括加载网络页面、加载本地页面、加载HTML格式的富文本数据。
页面加载过程中,若涉及网络资源获取,请在module.json5中配置网络访问权限,添加方法请参考在配置文件中声明权限。
  "requestPermissions":[
      {
        "name" : "ohos.permission.INTERNET"
      }
    ]
加载网络页面
开发者可以在Web组件创建时,指定默认加载的网络页面。在默认页面加载完成后,如果需要变更此Web组件显示的网络页面,可以通过调用loadUrl()接口加载指定的网页。Web组件的第一个参数变量src不能通过状态变量(例如:@State)动态更改地址,如需更改,请通过loadUrl()重新加载。
在下面的示例中,在Web组件加载完“www.example.com”页面后,开发者可通过loadUrl接口将此Web组件显示页面变更为“www.example1.com”。
// xxx.ets
import { webview } from '@kit.ArkWeb';
import { BusinessError } from '@kit.BasicServicesKit';

@Entry
@Component
struct WebComponent {
  controller: webview.WebviewController = new webview.WebviewController();

  build() {
    Column() {
      Button('loadUrl')
        .onClick(() => {
          try {
            // 点击按钮时,通过loadUrl,跳转到www.example1.com
            this.controller.loadUrl('www.example1.com');
          } catch (error) {
            console.error(`ErrorCode: ${(error as BusinessError).code},  Message: ${(error as BusinessError).message}`);
          }
        })
      // 组件创建时,加载www.example.com
      Web({ src: 'www.example.com', controller: this.controller })
    }
  }
}
加载本地页面
为了在启动、跳转、弱网等场景下减少用户等待感知,同时为动态内容加载争取时间,可以加载本地页面优化用户体验。
在下面的示例中展示加载本地页面文件的方法:
将本地页面文件放在应用的rawfile目录下,开发者可以在Web组件创建的时候指定默认加载的本地页面,并且加载完成后可通过调用loadUrl()接口变更当前Web组件的页面。
加载本地html文件时引用本地css样式文件可以通过以下方法实现。
<link rel="stylesheet" href="resource://rawfile/xxx.css">
<link rel="stylesheet" href="file:///data/storage/el2/base/haps/entry/cache/xxx.css">// 加载沙箱路径下的本地css文件。
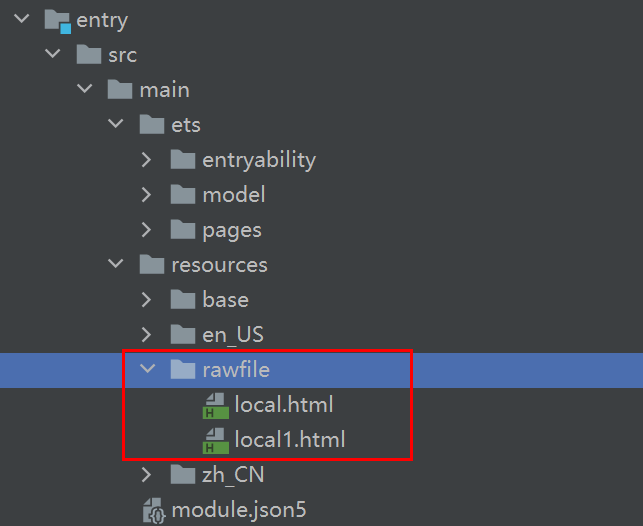
将资源文件放置在应用的resources/rawfile目录下。
图1 资源文件路径
应用侧代码。
  // xxx.ets
  import { webview } from '@kit.ArkWeb';
  import { BusinessError } from '@kit.BasicServicesKit';

  @Entry
  @Component
  struct WebComponent {
    controller: webview.WebviewController = new webview.WebviewController();

    build() {
      Column() {
        Button('loadUrl')
          .onClick(() => {
            try {
              // 点击按钮时,通过loadUrl,跳转到local1.html
              this.controller.loadUrl($rawfile("local1.html"));
            } catch (error) {
              console.error(`ErrorCode: ${(error as BusinessError).code},  Message: ${(error as BusinessError).message}`);
            }
          })
        // 组件创建时,通过$rawfile加载本地文件local.html
        Web({ src: $rawfile("local.html"), controller: this.controller })
      }
    }
  }
- local.html页面代码。
  <!-- local.html -->
  <!DOCTYPE html>
  <html>
    <body>
      <p>Hello World</p>
    </body>
  </html>
- local1.html页面代码。
  <!-- local1.html -->
  <!DOCTYPE html>
  <html>
    <body>
      <p>This is local1 page</p>
    </body>
  </html>
加载沙箱路径下的本地页面文件。
- 通过构造的单例对象GlobalContext获取沙箱路径。需要开启应用中文件系统的访问fileAccess权限。
   // GlobalContext.ets
   export class GlobalContext {
     private constructor() {}
     private static instance: GlobalContext;
     private _objects = new Map<string, Object>();

     public static getContext(): GlobalContext {
       if (!GlobalContext.instance) {
         GlobalContext.instance = new GlobalContext();
       }
       return GlobalContext.instance;
     }

     getObject(value: string): Object|undefined {
       return this._objects.get(value);
     }

     setObject(key: string, objectClass: Object): void {
       this._objects.set(key, objectClass);
     }
   }
   // xxx.ets
   import { webview } from '@kit.ArkWeb';
   import { GlobalContext } from '../GlobalContext';

   let url = 'file://' + GlobalContext.getContext().getObject("filesDir") + '/index.html';

   @Entry
   @Component
   struct WebComponent {
     controller: webview.WebviewController = new webview.WebviewController();

     build() {
       Column() {
         // 加载沙箱路径文件。
         Web({ src: url, controller: this.controller })
         .fileAccess(true)
       }
     }
   }
- 修改
EntryAbility.ets文件。
以filesDir为例,获取沙箱路径。若想获取其他路径,请参考应用文件路径。
   // xxx.ets
   import { AbilityConstant, UIAbility, Want } from '@kit.AbilityKit';
   import { webview } from '@kit.ArkWeb';
   import { GlobalContext } from '../GlobalContext';

   export default class EntryAbility extends UIAbility {
     onCreate(want: Want, launchParam: AbilityConstant.LaunchParam) {
       // 通过在GlobalContext对象上绑定filesDir,可以实现UIAbility组件与UI之间的数据同步。
       GlobalContext.getContext().setObject("filesDir", this.context.filesDir);
       console.log("Sandbox path is " + GlobalContext.getContext().getObject("filesDir"));
     }
   }
加载的html文件。
   <!-- index.html -->
   <!DOCTYPE html>
   <html>
       <body>
           <p>Hello World</p>
       </body>
   </html>
加载HTML格式的文本数据
Web组件可以通过loadData()接口实现加载HTML格式的文本数据。当开发者不需要加载整个页面,只需要显示一些页面片段时,可通过此功能来快速加载页面,当加载大量html文件时,需设置第四个参数baseUrl为”data”。
// xxx.ets
import { webview } from '@kit.ArkWeb';
import { BusinessError } from '@kit.BasicServicesKit';

@Entry
@Component
struct WebComponent {
  controller: webview.WebviewController = new webview.WebviewController();

  build() {
    Column() {
      Button('loadData')
        .onClick(() => {
          try {
            // 点击按钮时,通过loadData,加载HTML格式的文本数据
            this.controller.loadData(
              "<html><body bgcolor=\"white\">Source:<pre>source</pre></body></html>",
              "text/html",
              "UTF-8"
            );
          } catch (error) {
            console.error(`ErrorCode: ${(error as BusinessError).code},  Message: ${(error as BusinessError).message}`);
          }
        })
      // 组件创建时,加载www.example.com
      Web({ src: 'www.example.com', controller: this.controller })
    }
  }
}
Web组件可以通过data url方式直接加载HTML字符串。
// xxx.ets
import { webview } from '@kit.ArkWeb';
import { BusinessError } from '@kit.BasicServicesKit';

@Entry
@Component
struct WebComponent {
  controller: webview.WebviewController = new webview.WebviewController();
  htmlStr: string = "data:text/html, <html><body bgcolor=\"white\">Source:<pre>source</pre></body></html>";

  build() {
    Column() {
      // 组件创建时,加载htmlStr
      Web({ src: this.htmlStr, controller: this.controller })
    }
  }
}
resource协议加载本地资源
resource协议允许访问应用资源目录中的文件。
import { webview } from '@kit.ArkWeb';

@Entry
@Component
struct ResourceWebComponent {
  controller: webview.WebviewController = new webview.WebviewController();

  build() {
    Column() {
      Button('加载Resource资源')
        .onClick(() => {
          try {
            // 通过resource加载resources/rawfile目录下的index1.html文件
            this.controller.loadUrl('resource://rawfile/index1.html');
          } catch (error) {
            console.error(`ErrorCode: ${error.code}, Message: ${error.message}`);
          }
        })

      // 组件创建时直接使用resource协议加载资源
      Web({
        src: 'resource://rawfile/index.html', controller: this.controller})
    }
  }
}
在“src\main\resources\rawfile”文件夹下创建index.html:
<!-- index.html -->
<!DOCTYPE html>
<html>
  <body>
    <p>Hello World</p>
  </body>
</html>
在“src\main\resources\rawfile”文件夹下创建index1.html:
<!-- index1.html -->
<!DOCTYPE html>
<html>
  <body>
    <p>Hello World Again</p>
  </body>
</html>
相关实例
针对Web组件开发,有以下相关实例可供参考:
你可能感兴趣的鸿蒙文章
harmony 鸿蒙应用侧与前端页面的相互调用(C/C++)
harmony 鸿蒙建立应用侧与前端页面数据通道(C/C++)
- 所属分类: 后端技术
- 本文标签:
热门推荐
-
2、 优质文章
-
3、 gt
-
7、 openharmony
-
9、 golang
-
10、 Vue中input框自动聚焦