harmony 鸿蒙Distributed Camera Development
Distributed Camera Development
Overview
OpenHarmony distributed camera implements collaboration across devices by breaking hardware boundaries. For example, after devices A and B running OpenHarmony are networked, the application on device A can call the camera resources of device B in real time to obtain images (preview stream, photo stream, or video stream) from device B. In addition, in-depth controls such as resolution adjustment and settings synchronization are supported on device A. Distributed camera achieves the following breakthroughs: - Collaborative creation with multiple users - Remote collaboration with experts - Immersive security system - Distributed audio and video interaction
Basic Concepts
Before started, you are advised to read the following topics to have a basic understanding of related functions: - UIAbility Connection Development - Camera Device Management (ArkTS) - Camera Development Preparations - Camera Session Management (ArkTS) - Photo Capture (ArkTS) - Video Recording (ArkTS)
Preparing the Environment
Environment Requirements
Successful networking between device A and device B.
Environment Setup
- Install DevEco Studio 5.0 or later.
- Update the public-SDK to API version 16 or later. For details, see OpenHarmony SDK Upgrade Assistant.
- Connect device A and device B to the PC using USB cables.
- Connect device A and device B to the same Wi-Fi, identify each other, and start networking. For details, see UIAbility Connection Development.
Environment Verification
Run the following shell command on the PC:
  hdc shell
  hidumper -s 4700 -a "buscenter -l remote_device_info"
If the networking is successful, the number of networking devices is displayed, for example, remote device num = 1.
How to Develop
OpenHarmony pools cameras on multiple devices to provide users with the capability of using cameras across devices.
Development Process
The figure below shows the recommended development process.
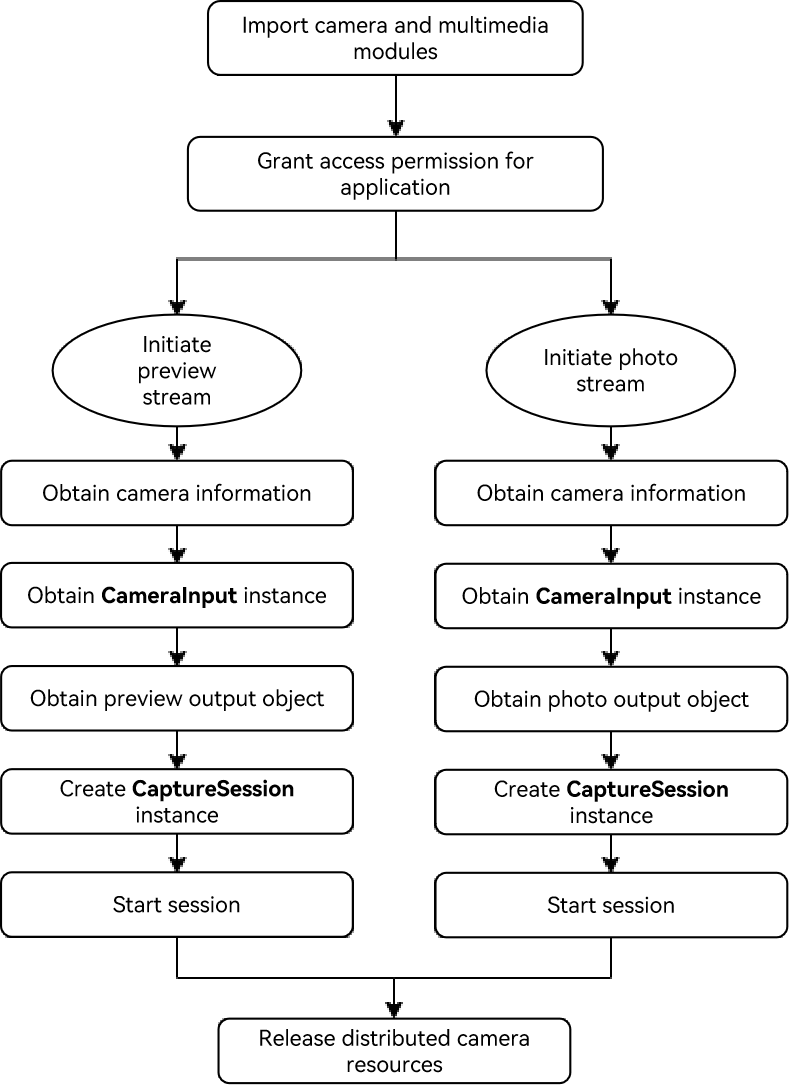
Development Procedure
Importing the Camera and Multimedia Modules
  import { camera } from '@kit.CameraKit';
  import { media } from '@kit.MediaKit';
Granting the Access Permission to the Application
The application should apply for required permissions, which include but are not limited to the following: - For accessing the location of an image or a video: ohos.permission.MEDIA_LOCATION - For reading files: ohos.permission.READ_MEDIA - For writing files: ohos.permission.WRITE_MEDIA - For using camera: ohos.permission.CAMERA - For multi-device collaboration: ohos.permission.DISTRIBUTED_DATASYNC
For example, you can call requestPermissionsFromUser() to request the corresponding permissions for the UIAbility.
  //EntryAbility.ets
  export default class EntryAbility extends UIAbility {
    onCreate(want, launchParam) {
      Logger.info('Sample_VideoRecorder', 'Ability onCreate,requestPermissionsFromUser');
      let permissionNames: Array<Permissions> = ['ohos.permission.MEDIA_LOCATION', 'ohos.permission.READ_MEDIA',
        'ohos.permission.WRITE_MEDIA', 'ohos.permission.CAMERA', 'ohos.permission.MICROPHONE', 'ohos.permission.DISTRIBUTED_DATASYNC'];
      abilityAccessCtrl.createAtManager().requestPermissionsFromUser(this.context, permissionNames).then((data)=> {
        console.log("testTag", data);
      })
        .catch((err : BusinessError) => {
          console.log("testTag", err.message);
        });
    }
Initiating the Preview Stream and Photo Stream on the Distributed Camera
1. Obtaining the Camera Information of a Remote Device
After the application networking is successful, you can use getCameraManager() to obtain the camera manager instance and getSupportedCameras() to obtain the supported camera device object.
  private cameras?: Array<camera.CameraDevice>;
  private cameraManager?: camera.CameraManager;
  private cameraOutputCapability?: camera.CameraOutputCapability;
  private cameraIndex: number = 0;
  private curVideoProfiles?: Array<camera.VideoProfile>;

  function initCamera(): void {
    console.info('init remote camera called');
    if (this.cameraManager) {
      console.info('cameraManager already exits');
      return;
    }
    console.info('[camera] case to get cameraManager');
    this.cameraManager = camera.getCameraManager(globalThis.abilityContext);
    if (this.cameraManager) {
      console.info('[camera] case getCameraManager success');
    } else {
      console.info('[camera] case getCameraManager failed');
      return;
    }
    this.cameras = this.cameraManager.getSupportedCameras();
    if (this.cameras) {
      console.info('[camera] case getCameras success, size ', this.cameras.length);
      for (let i = 0; i < this.cameras.length; i++) {
        let came: camera.CameraDevice = this.cameras[i];
        console.info('[came] camera json:', JSON.stringify(came));
        if (came.connectionType == camera.ConnectionType.CAMERA_CONNECTION_REMOTE) {
          this.cameraIndex = i;
          this.cameraOutputCapability = this.cameraManager.getSupportedOutputCapability(came);
          this.curVideoProfiles = this.cameraOutputCapability.videoProfiles;
          console.info('init remote camera done'); // The remote camera is successfully initialized.
          break;
        }
      }
    } else {
      console.info('[camera] case getCameras failed');
    }
  }
2. Creating a CameraInput Instance
After obtaining the CameraManager instance and the supported camera device object, call createCameraInput() to create a CameraInput instance.
  // create camera input
  async createCameraInput(): Promise<void> {
    console.log('createCameraInput called');
    if (this.cameras && this.cameras.length > 0) {
      let came: camera.CameraDevice = this.cameras[this.cameraIndex];
      console.log('[came]createCameraInput camera json:', JSON.stringify(came));
      this.cameraInput = this.cameraManager?.createCameraInput(came);
      if (this.cameraInput) {
        console.log('[camera] case createCameraInput success');
        await this.cameraInput.open().then(() => {
          console.log('[camera] case cameraInput.open() success');
        }).catch((err: Error) => {
          console.log('[camera] cameraInput.open then.error:', json.stringify(err));
        });
      } else {
        console.log('[camera] case createCameraInput failed');
        return;
      }
    }
  }
3. Obtaining the PreviewOutput Object
Use createPreviewOutput() to create a PreviewOutput object.
  private previewOutput?: camera.PreviewOutput;
  private avConfig: media.AVRecorderConfig = {
    videoSourceType: media.VideoSourceType.VIDEO_SOURCE_TYPE_SURFACE_YUV,
    profile: this.avProfile,
    url: 'fd://',
  }

  // create camera preview
  async createPreviewOutput(): Promise<void> {
    console.log('createPreviewOutput called');
    if (this.cameraOutputCapability && this.cameraManager) {
      this.previewProfiles = this.cameraOutputCapability.previewProfiles;
      console.log('[camera] this.previewProfiles json ', json.stringify(this.previewProfiles));
      if (this.previewProfiles[0].format === camera.CameraFormat.CAMERA_FORMAT_YUV_420_SP) {
        console.log('[camera] case format is VIDEO_SOURCE_TYPE_SURFACE_YUV');
        this.avConfig.videoSourceType = media.VideoSourceType.VIDEO_SOURCE_TYPE_SURFACE_YUV;
      } else {
        console.log('[camera] case format is VIDEO_SOURCE_TYPE_SURFACE_ES');
        this.avConfig.videoSourceType = media.VideoSourceType.VIDEO_SOURCE_TYPE_SURFACE_ES;
      }
      this.previewOutput = this.cameraManager.createPreviewOutput(this.previewProfiles[0], this.surfaceId);
      if (!this.previewOutput) {
        console.log('create previewOutput failed!');
      }
      console.log('createPreviewOutput done');
    }
  }
4. Obtaining the PhotoOutput Object
Use createPhotoOutput() to create a PhotoOutput object and createImageReceiver() to create an ImageReceiver instance.
  import fileio from '@ohos.fileio';

  private photoReceiver?: image.ImageReceiver;
  private photoOutput?: camera.PhotoOutput;
  private mSaveCameraAsset: SaveCameraAsset = new SaveCameraAsset('Sample_VideoRecorder');

  async getImageFileFd(): Promise<void> {
    console.info'getImageFileFd called');
    this.mFileAssetId = await this.mSaveCameraAsset.createImageFd();
    this.fdPath = 'fd://' + this.mFileAssetId.toString();
    this.avConfig.url = this.fdPath;
    console.info('ImageFileFd is: ' + this.fdPath);
    console.info('getImageFileFd done');
  }

  // close file fd
  async closeFd(): Promise<void> {
    console.info('case closeFd called');
    if (this.mSaveCameraAsset) {
      await this.mSaveCameraAsset.closeVideoFile();
      this.mFileAssetId = undefined;
      this.fdPath = undefined;
      console.info('case closeFd done');
    }
  }

  async createPhotoOutput() {
    const photoProfile: camera.Profile = {
      format: camera.CameraFormat.CAMERA_FORMAT_JPEG,
      size: {
        "width": 1280,
        "height": 720
      }
    }
    if (!this.cameraManager) {
      console.log('createPhotoOutput cameraManager is null')
    }
    if (!this.photoReceiver) {
      this.photoReceiver = image.createImageReceiver(photoProfile.size.width, photoProfile.size.height, photoProfile.format, 8)
      this.photoReceiver.on("imageArrival",()=>{
        this.photoReceiver?.readNextImage((err,image)=>{
          if (err||image === undefined) {
            console.log('photoReceiver imageArrival on error')
            return
          }
          image.getComponent(4, async (err, img) => {
            if (err||img === undefined) {
              console.log('image getComponent on error')
              return
            }
            await this.getImageFileFd()
            fileio.write(this.mFileAssetId, img.byteBuffer)
            await this.closeFd()
            await image.release()
            console.log('photoReceiver image.getComponent save success')
          })
        })
      })
        await this.photoReceiver.getReceivingSurfaceId().then((surfaceId: string) => {
          this.photoOutput = this.cameraManager?.createPhotoOutput(photoProfile, surfaceId)
          if (!this.photoOutput) {
            console.log('cameraManager.createPhotoOutput on error')
          }
          console.log('cameraManager.createPhotoOutput success')
          this.photoOutput?.on("captureStart", (err, captureId) => {
            console.log('photoOutput.on captureStart')
          })
        }).catch((err: Error) => {
          console.error('photoReceiver.getReceivingSurfaceId on error:' + err)
        })
      }
    }
5. Creating a CaptureSession Instance
Use createCaptureSession() to create a CaptureSession instance. You can call beginConfig() to configure a session, call addInput() and addOutput() to add CameraInput() and CameraOutput() to the session, call commitConfig() to submit the configuration information, and use a promise to return the result.
  private captureSession?: camera.CaptureSession;

  function failureCallback(error: BusinessError): Promise<void> {
    console.log('case failureCallback called,errMessage is ', json.stringify(error));
  }

  function catchCallback(error: BusinessError): Promise<void> {
    console.log('case catchCallback called,errMessage is ', json.stringify(error));
  }

  // create camera capture session
  async createCaptureSession(): Promise<void> {
    console.log('createCaptureSession called');
    if (this.cameraManager) {
      this.captureSession = this.cameraManager.createCaptureSession();
      if (!this.captureSession) {
        console.log('createCaptureSession failed!');
        return
      }
      try {
        this.captureSession.beginConfig();
        this.captureSession.addInput(this.cameraInput);
      } catch (e) {
        console.log('case addInput error:' + json.stringify(e));
      }
      try {
        this.captureSession.addOutput(this.previewOutput);
      } catch (e) {
        console.log('case addOutput error:' + json.stringify(e));
      }
      await this.captureSession.commitConfig().then(() => {
        console.log('captureSession commitConfig success');
      }, this.failureCallback).catch(this.catchCallback);
    }
  }
6. Starting the Session
Use start() of the CaptureSession instance to start the session and use a promise to return the result.
  // start captureSession
  async startCaptureSession(): Promise<void> {
    console.log('startCaptureSession called');
    if (!this.captureSession) {
      console.log('CaptureSession does not exists!');
      return
    }
    await this.captureSession.start().then(() => {
      console.log('case start captureSession success');
    }, this.failureCallback).catch(this.catchCallback);
  }
Releasing Distributed Camera Resources
After the service collaboration is complete, the collaboration status needs to be ended in a timely manner to release distributed camera resources.
  // Release the camera.
  async releaseCameraInput(): Promise<void> {
    console.log('releaseCameraInput called');
    if (this.cameraInput) {
      this.cameraInput = undefined;
    }
    console.log('releaseCameraInput done');
  }

  // Release the preview.
  async releasePreviewOutput(): Promise<void> {
    console.log('releasePreviewOutput called');
    if (this.previewOutput) {
      await this.previewOutput.release().then(() => {
        console.log('[camera] case main previewOutput release called');
      }, this.failureCallback).catch(this.catchCallback);
      this.previewOutput = undefined;
    }
    console.log('releasePreviewOutput done');
  }

  // Release the video output.
  async releaseVideoOutput(): Promise<void> {
    console.log('releaseVideoOutput called');
    if (this.videoOutput) {
      await this.videoOutput.release().then(() => {
        console.log('[camera] case main videoOutput release called');
      }, this.failureCallback).catch(this.catchCallback);
      this.videoOutput = undefined;
    }
    console.log('releaseVideoOutput done');
  }

  // Stop the capture session.
  async stopCaptureSession(): Promise<void> {
    console.log('stopCaptureSession called');
    if (this.captureSession) {
      await this.captureSession.stop().then(() => {
        console.log('[camera] case main captureSession stop success');
      }, this.failureCallback).catch(this.catchCallback);
    }
    console.log('stopCaptureSession done');
  }

  // Release the capture session.
  async releaseCaptureSession(): Promise<void> {
    console.log('releaseCaptureSession called');
    if (this.captureSession) {
      await this.captureSession.release().then(() => {
        console.log('[camera] case main captureSession release success');
      }, this.failureCallback).catch(this.catchCallback);
      this.captureSession = undefined;
    }
    console.log('releaseCaptureSession done');
  }

  // Release the camera resource.
  async releaseCamera(): Promise<void> {
    console.log('releaseCamera called');
    await this.stopCaptureSession();
    await this.releaseCameraInput();
    await this.releasePreviewOutput();
    await this.releaseVideoOutput();
    await this.releaseCaptureSession();
    console.log('releaseCamera done');
  }
Debugging and Verification
After application development is complete, you can install the application on device A and device B. The test procedure is as follows:
- Device A starts the distributed camera on device B and initiates a preview. Device A can receive the preview stream.
- Device A starts the distributed camera on device B and takes a photo. Device A can receive the photo.
FAQs
What should I do if the application on device A cannot start the camera on device B?
Possible Causes
Devices are not networked or are disconnected after networking.
Solution
Enable USB debugging on device A and device B, and use a USB cable to connect the devices to the PC. Run the following shell command on the PC:
  hdc shell
  hidumper -s 4700 -a "buscenter -l remote_device_info"
If remote device num = 0 is displayed in the command output, the networking fails. In this case, disable and then enable Wi-Fi, and connect devices to the same Wi-Fi again. If the networking is successful, run the shell command again and the number of networking devices is displayed, for example, remote device num = 1.
你可能感兴趣的鸿蒙文章
harmony 鸿蒙Distributed Service Kit
harmony 鸿蒙UIAbility Connection Development
harmony 鸿蒙Distributed Device Management Development
harmony 鸿蒙Distributed Extension Development
- 所属分类: 后端技术
- 本文标签:
热门推荐
-
2、 优质文章
-
3、 gt
-
7、 openharmony
-
9、 golang
-
10、 Vue中input框自动聚焦